VMware ESXi 5.5 – Network Time Protocol (NTP) Configuration

You may use the following method to configure the Network Time Protocol (NTP) on a VMware ESXi 5.5 host.

1. Connect to the VMware ESXi 5.5 host using the VMware vSphere Client 5.5.

01


2. In the VMware vSphere Client 5.5 navigate to Configuration > Time Configuration and on the Time Configuration screen click Properties….

02


3. In the Time Configuration dialog box manually configure the date and time then select the check box next to NTP Client Enabled then click Options….

03


4. In the NTP Daemon (ntpd) Options dialog box select the NTP Settings option and add the NTP servers and select the check box to Restart NTP server to apply changes. Next, select the General tab then the option to Start automatically if any ports are open, and stop when all ports are closed then click OK.

04-1

04-2


5. In the Time Configuration dialog box click OK.

05


6. The Time Configuration screen should show the correct time, data, NTP Client status as Running and the NTP Servers you configured.

06


Enjoy!


VMware ESXi 5.5 – Management Network Configuration

You may use the following method to configure the management network on a VMware ESXi 5.5 host.


1. On the VMware Direct Console User Interface (DCUI) press F2.

09

2. In the Authentication Required dialog box enter the root password then hit enter.

10


3. On the System Customization screen select Configure Management Network.

11

4. On the Configure Management Network screen verify the Network Adapters.

12

5. On the Configure Management Network screen select IP Configuration.

13

6. In the IP Configuration dialog box configure the static Internet Protocol (IP) address.

14


7. On the Configure Management Network screen hit Esc.

15

8. In the Configure Management Network: Confirm dialog box hit Y to apply the changes to the management network.

16


9. On the System Customization screen select Test Management Network.

17

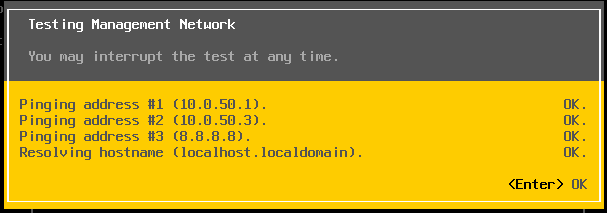
10. In the Test Management Network dialog box enter up to (3) IP addresses to test network connectivity then hit Enter.

18


18-2


11. Verify that the IP address on the DCUI is correct.

19


Enjoy!


VMware ESXi 5.5 – Interactive Installation

You may use the following method to perform an interactive installation and configuration of a VMware ESXi 5.5 host.

1. On the ESXi-5.5.0-20140902001-standard Boot Menu page select ESXi-5.5.0-20140902001-standard Installer.

01


2. In the Welcome to the VMware ESXi 5.5.0 Installation dialog box hit Enter to continue.

02


3. In the End User License Agreement (EULA) dialog box  hit F11 to accept the EULA.

03


4. In the Select a Disk to Install or Upgrade dialog box verify that the correct hard disk is selected then hit Enter to continue.

04


5. In the Please select a keyboard layout dialog box select US Default then hit Enter to continue.

05


6. In the Enter a root password dialog box enter a password then hit Enter.

06


7. In the Confirm Install dialog box hit F11.

07


8. In the Installation Complete dialog box hit Enter to reboot the server.

08


Enjoy!


VMware ESXi 5.5 – Interactive Installation and Configuration Checklist

VMware ESXi 5.5 Installation

1. Verify that the host server’s BIOS hardware clock is configure to use UTC±0.

2. Select the correct disk to install VMware ESXi 5.5.

3. Select a keyboard layout.

4. Enter a password for the VMware ESXi root account.

5. Remove bootable media upon the completion of the installation.


Management Network Configuration

1. Configure the management network (with NIC teaming).

2. Test management network.

3. Verify the Internet Protocol (IP) address on the Direct Console User Interface (DCUI) is correct.


Network Time Protocol (NTP) Configuration

1. Install the VMware vSphere client 5.5.

2. Configure NTP on the VMware ESXi 5.5 host.


Domain Name System (DNS)  and Routing Configuration

1. Configure the DNS servers using the VMware vSphere client 5.5.

2. Verify the default gateway is configured correctly.

3. Create Domain Name System (DNS) records for the host on your DNS server(s).


VMware Workstation 11 – Virtual Machine Configuration

You may use the following method to configure a virtual machine (VM) in VMware Workstation 11.


1. On the Welcome to the New Virtual Machine Wizard page select Custom (advanced) then click Next >.

2. On the Choose the Virtual Machine Hadware Compatability page under the Hardware compatability: option select Workstation 11.0 then click Next >.

3. On the Guest Operating System Installation page select I will install the operating system later then click Next >.

4. On the Select a Guest Operating System page select the correct operating system then click Next >.

5. On the Name the Virtual Machine page enter a descriptive name for this virtual machine then click Next >.

6. On the Firmware Type page select BIOS then click Next >.

7. On the Processor Configuration page select the number of processors as well as the number of cores per processor then click Next >.

8. On the Memory for the Virtual Machine page configure the memory allocation for this virtual machine then click Next >.

9. On the Network Type page select the correct Network connection then click Next >.

10. On the Select I/O Controller Types select the controller type, if available, then click Next >.

11. On the Select a Disk Type page select the Virtual disk type then click Next >.

12. On the Select a Disk page select Create a new virtual disk then click Next >.

13. On the Specify Disk Capacity page configure the size of the hard disk and select the options to Allocate all disk space now  and Store virtual disk as a single file then click Next >.

14. On the Specify Disk File page click Next >.

15. On the Ready to Create Virtual Machine page review the configuration for the virtual machine then click Finish.


Enjoy!


Technical Utilities – YUMI (Your Universal Multiboot Integrator)

I have found YUMI (Your Universal Multiboot Integrator) to be very helpful.


Enjoy!


Symantec Backup Exec 2012 – Graphical User Interface

I found this great blog post from Symantec that provides a short tutorial on navigating the graphical user interface of Symantec Backup Exec 2012.


Enjoy!


Microsoft Windows PowerShell – Query a List of SAMAccountNames

The Microsoft PowerShell script below may be used to query a list of Microsoft Active Directory SAMAccountNames from a Notepad (.txt) file and output the Given Name and Enabled status in a CSV file.


#This scrip will query a list of SAMAccountNames from a notepad (.txt) file and provide the Name and Enabled status
#
#Provide the path to the Notepad (.txt) file tha contains the list of SAMAccountNames
$– USERS = Get-Content “<<File Path>>”
$– USERS | ForEach {Get-ADUser $_ -Properties * | Select SAMAccountName, Name, Enabled} | Export-CSV -Path “<<File Path>>”


Enjoy!


Microsoft Windows Server 2012 – Local User Rights

You may use the following method to assign local or domain users and/or groups local user rights on a server running the Windows Server 2012 operating system (OS).

Navigate to Administrative Tools > Local Security Policy > Security Settings > Local Policies > User Right Assignment.


Microsoft Exchange Server 2007 – Convert a Mailbox Type

You may use the following command to convert a Microsoft Exchange Server 2007 mailbox to a User Mailbox.

Set-Mailbox “User Name” -Type Regular

NOTE: Replace “User Name” with the actual username of the user.

Enjoy!