Month: November 2016

Microsoft Windows PowerShell – nslookup Configuration

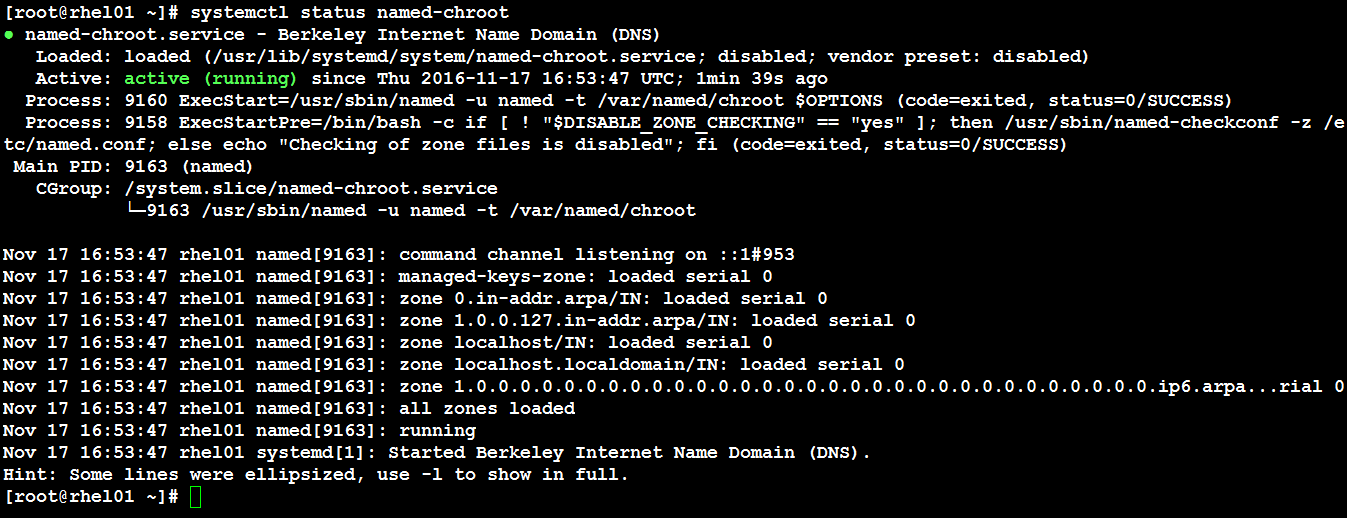
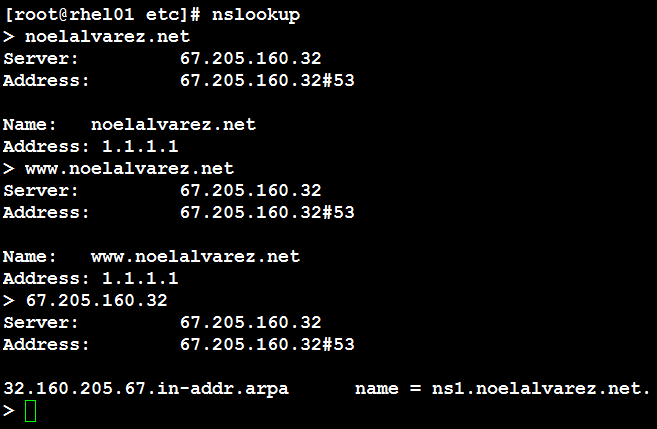
You may use the following commands at a Microsoft Windows PowerShell to configure a default domain name system (DNS) server, for that instance, as well specify the type(s) of DNS records to resolve. This may be used for daily support of DNS.

  1. nslookup
  2. server <<<IP ADDRESS>>>
  3. set type=<<<DNS RECORD>>>
  4. domain.com

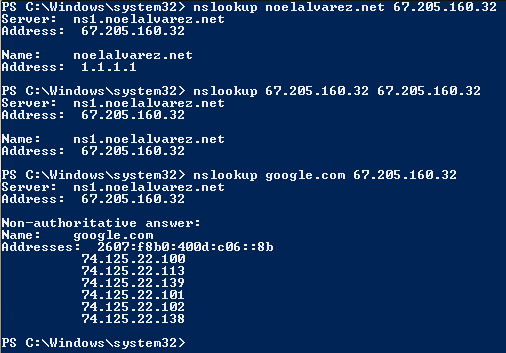
For example, if you wanted to configure the nslookup session to utilize a Google public DNS server (google-public-dns-a.google.com) and query the domain google.com for all DNS records you would enter the following commands.

  1. nslookup
  2. server 8.8.8.8
  3. set type=all
  4. google.com

Additionally, more information may be found using this link.


Red Hat Enterprise Linux 7 – BIND Installation and Configuration

Domain Name System (DNS) is an integral component of any Information Technology (IT) infrastructure. This is a step by step guide for configuring a Red Hat Enterprise Linux 7 public facing DNS server using the BIND software package. Additionally, I would like to add that, for the purposes of this demonstration the zone file created for noelalvarez.net is not pointing to the genuine Internet Protocol (IP) address of the website.

  1. Enter the command yum update -y to update the server.01
  2. Enter the command yum install bind-chroot bind-utils -y to install bind and DNS utilities.02-0102-0202-03
  3. Enter the command systemctl start named-chroot to start the DNS server.03
  4. Enter the command systemctl status named-chroot to verify the DNS server is running.04
  5. Enter the command rndc status to verify the name server control utility is running (i.e. server is up and running).05
  6. Enter the command journalctl -u named-chroot to verify there are no errors.06-0106-02
  7. Enter the command systemctl enable named-chroot to configure BIND to start automatically after a reboot.07
  8. Enter the command cd /etc to navigate to the etc directory.08
  9. Enter the command cp named.conf named.conf.2016111700 to create a copy of the named.conf file.09
  10. Using a text editor, edit the following fields in the name.conf file.
    1. listen-on port 53 { 127.0.0.1; }; NOTE: Add the Internet Protocl (IP) address of the host.10-01
    2. allow-query     { localhost; }; NOTE: delete localhost; and add any;.10-01
    3. Add a forward lookup zone.10-02
    4. Add a reverse lookup zone.10-02
  11. Enter the command named-checkconf to verify the named.conf file has not syntax errors.11
  12. Enter the command cd /var/named/chroot/var/named/ to navigate to the named directory.12
  13. Using a text editor create the zone file for a forward lookup. In this example it is noelalvarez.net.13
  14. Using a text editor create the zone file for reverse lookup. In this example it is the 67.205.160.0/24 IP address range.14
  15. Enter the command rndc reload to read the changes made to the named.conf and zone files.15
  16. Enter the command cd /etc to navigate to the etc directory.16
  17. Using a text editor, edit the resolv.conf file by adding configuring the server to use it’s IP address for name resolution.17
  18. Enter the command dig noelalvarez.net to query the name server for the A record of noelalvarez.net.18
  19. Additionally, you may use nslookup to query the name server for the various records that were created.19
  20. Lastly, you may query the name server from a host on an external network to verify it is a public facing DNS server.20