Category: Linux

Ubuntu – Eth0 Missing after Virtual Machine Migration

I recently performed the migration of a Microsoft Hyper-V virtual machine (VM) running Ubuntu 16.04.5 LTS to VMware using the VMware vCenter Converter. After the migration the VM would not connect to the network. Upon research I found that the eth0 network interface was renamed to ens160. This was determined by running the following command:

dmesg | grep eth0

There was a line that said:

vmxnet3 0000:03:00.0 ens160: renamed from eth0

The final step was to create a backup of the /etc/network/interfaces file then edit it using the vi editor by removing all entries of eth0 and replacing them with the new network interface name of ens160.

Red Hat Enterprise Linux 7 – Sample Kickstart File

Red Hat Enterprise Linux (RHEL) 7 provides a kickstart file that you may use to automate the installation of RHEL. Below is a sample kickstart file (ks.cfg) that you may modify for the automated installation of RHEL.


#version=DEVEL
# System authorization information
auth –enableshadow –passalgo=sha512
# Use CDROM installation media
cdrom
# Use graphical install
graphical
# Run the Setup Agent on first boot
firstboot –enable
ignoredisk –only-use=sda
# Keyboard layouts
keyboard –vckeymap=us –xlayouts=’us’
# System language
lang en_US.UTF-8

# Network information
network –bootproto=static –device=eth0 –gateway=x.x.x.x –ip=x.x.x.x –nameserver=x.x.x.x,x.x.x.x –netmask=x.x.x.x –ipv6=auto –activate
network –hostname=rhel01

# Root password
rootpw –iscrypted $6$fa
# System services
services –disabled=”chronyd”
# System timezone
timezone America/New_York –isUtc –nontp
user –name=tuser –password=$6$zn

iscrypted –gecos=”Temporary User”
# X Window System configuration information
xconfig –startxonboot
# System bootloader configuration
bootloader –append=” crashkernel=auto” –location=mbr –boot-drive=sda
# Partition clearing information
clearpart –all –initlabel –drives=sda
# Disk partitioning information
part /boot –fstype=”xfs” –ondisk=sda –size=500
part swap –fstype=”swap” –ondisk=sda –size=4096
part pv.614 –fstype=”lvmpv” –ondisk=sda –size=46603
volgroup centos –pesize=4096 pv.614
logvol / –fstype=”xfs” –size=20480 –name=root –vgname=centos
logvol /home –fstype=”xfs” –size=26120 –name=home –vgname=centos

%packages
@^graphical-server-environment
@base
@core
@desktop-debugging
@dial-up
@fonts
@gnome-desktop
@guest-agents
@guest-desktop-agents
@input-methods
@internet-browser
@multimedia
@print-client
@x11
kexec-tools

%end

%addon com_redhat_kdump –enable –reserve-mb=’auto’

%end


Red Hat Enterprise Linux 7 – BIND Installation and Configuration

Domain Name System (DNS) is an integral component of any Information Technology (IT) infrastructure. This is a step by step guide for configuring a Red Hat Enterprise Linux 7 public facing DNS server using the BIND software package. Additionally, I would like to add that, for the purposes of this demonstration the zone file created for noelalvarez.net is not pointing to the genuine Internet Protocol (IP) address of the website.

  1. Enter the command yum update -y to update the server.01
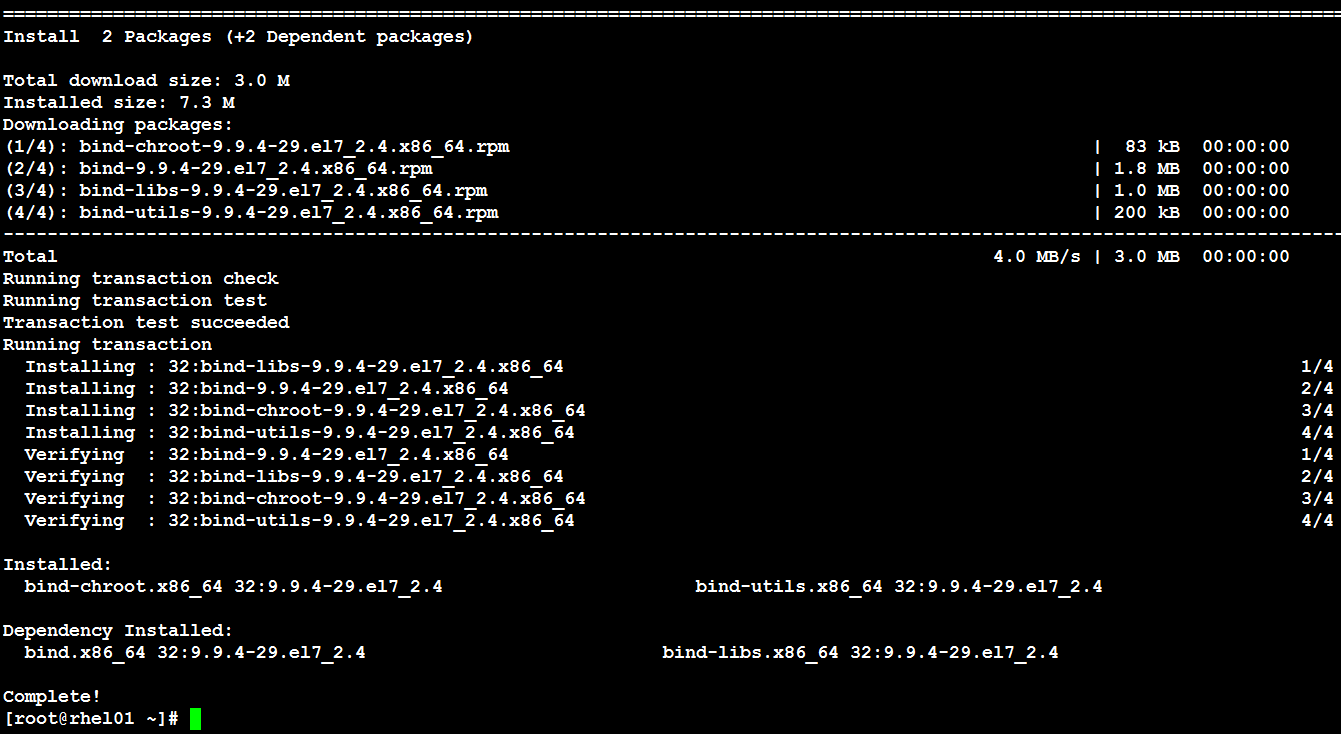
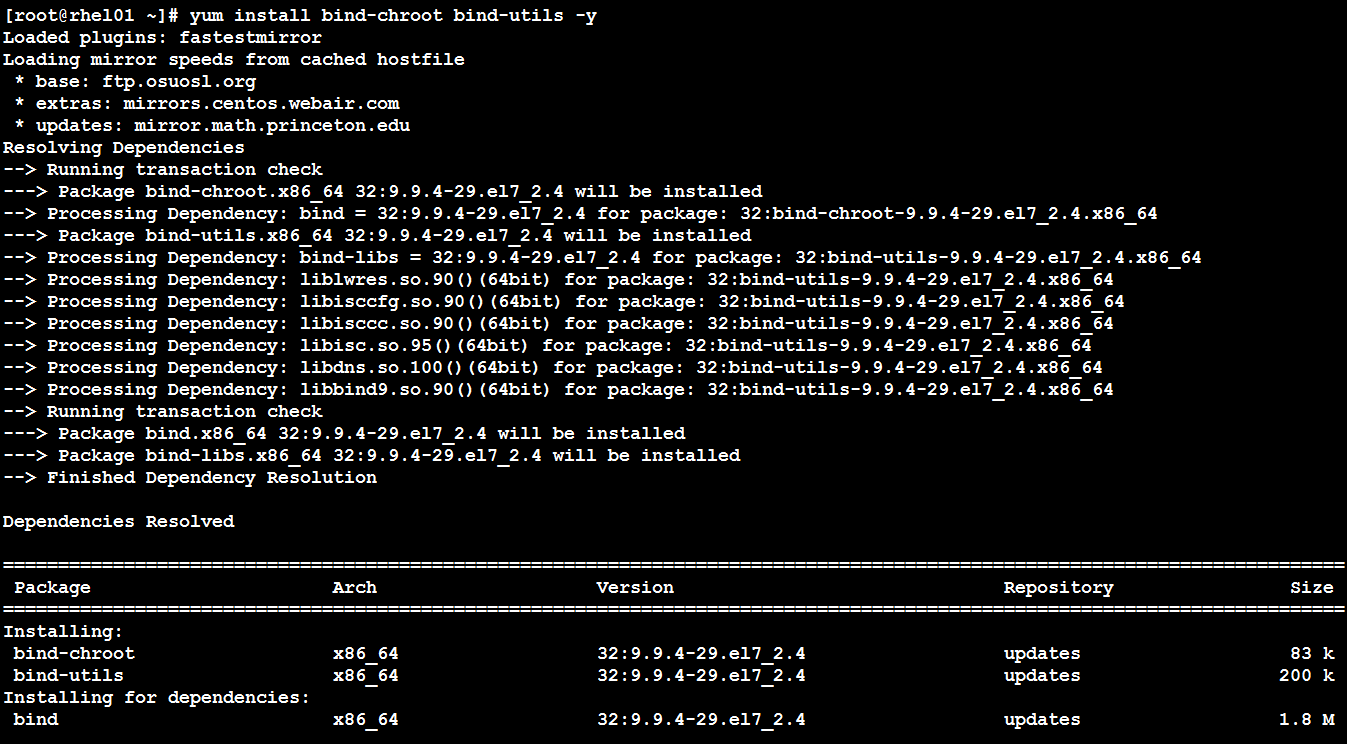
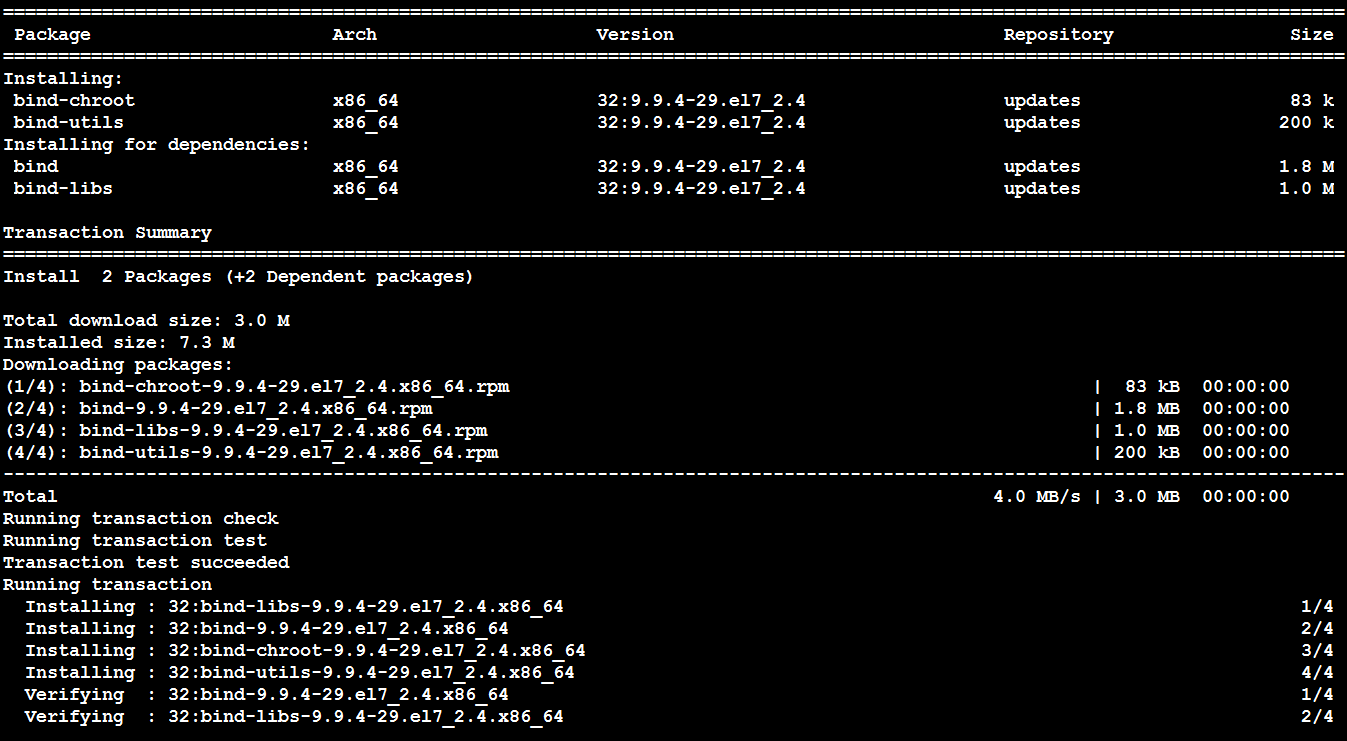
  2. Enter the command yum install bind-chroot bind-utils -y to install bind and DNS utilities.02-0102-0202-03
  3. Enter the command systemctl start named-chroot to start the DNS server.03
  4. Enter the command systemctl status named-chroot to verify the DNS server is running.04
  5. Enter the command rndc status to verify the name server control utility is running (i.e. server is up and running).05
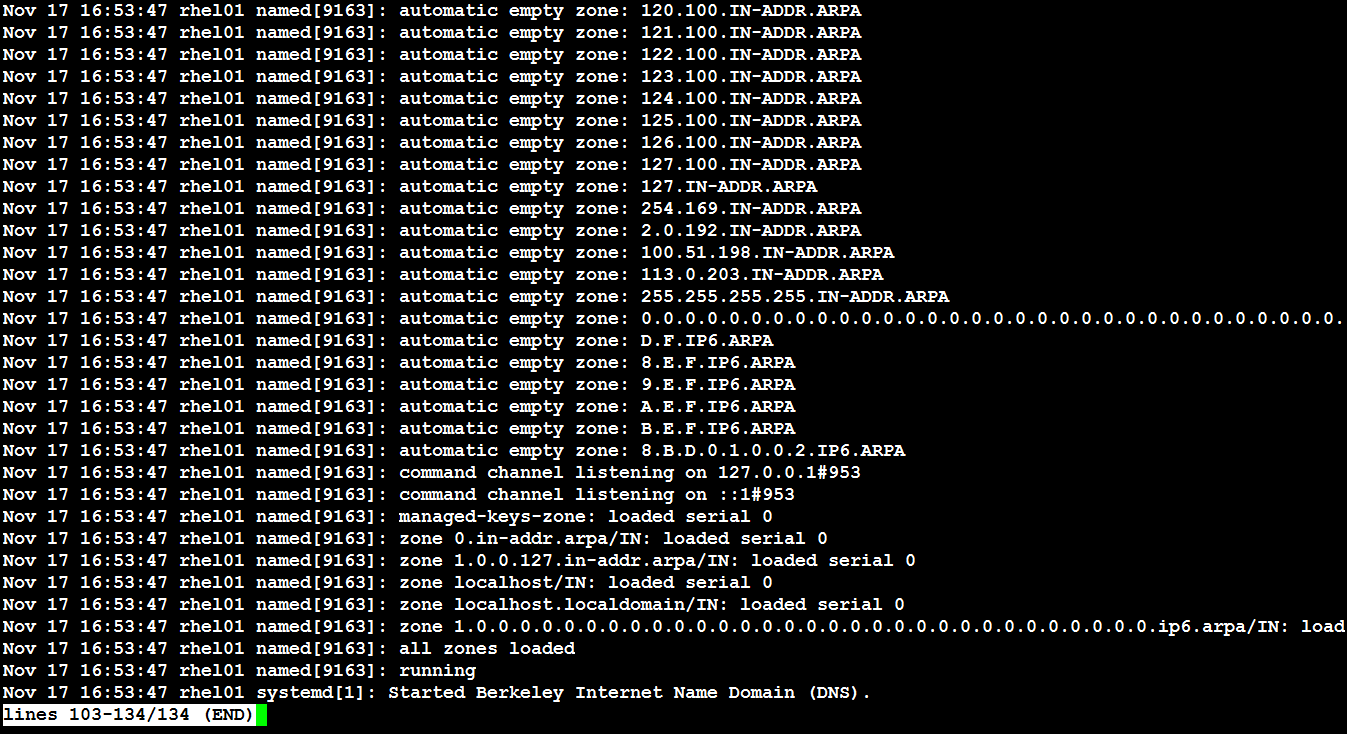
  6. Enter the command journalctl -u named-chroot to verify there are no errors.06-0106-02
  7. Enter the command systemctl enable named-chroot to configure BIND to start automatically after a reboot.07
  8. Enter the command cd /etc to navigate to the etc directory.08
  9. Enter the command cp named.conf named.conf.2016111700 to create a copy of the named.conf file.09
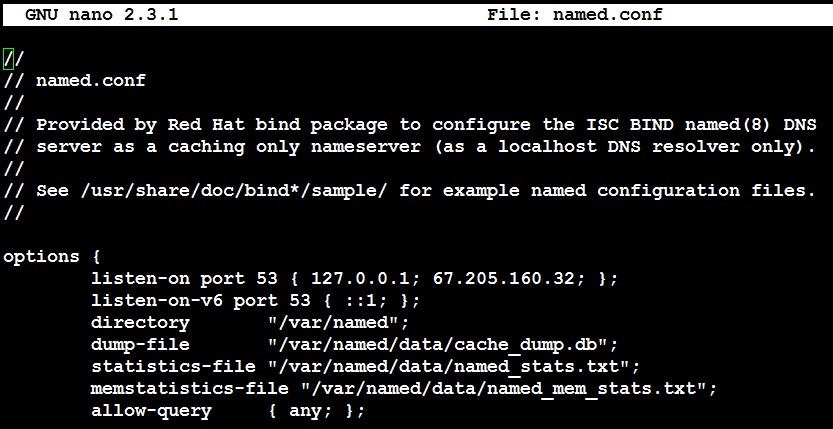
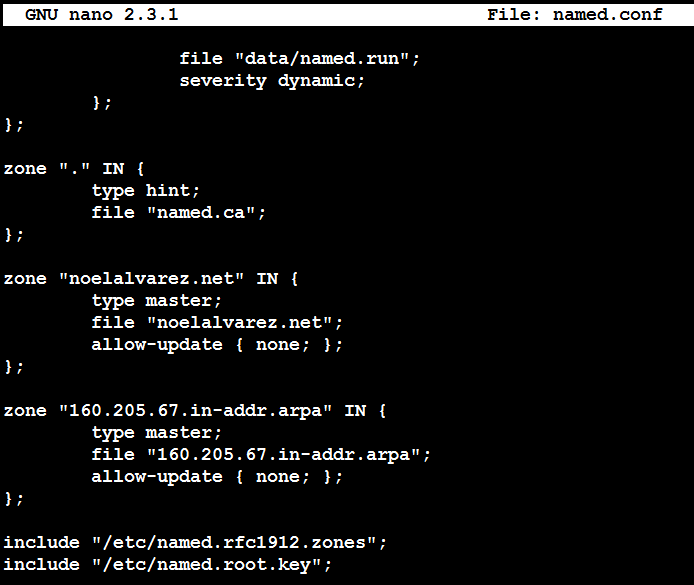
  10. Using a text editor, edit the following fields in the name.conf file.
    1. listen-on port 53 { 127.0.0.1; }; NOTE: Add the Internet Protocl (IP) address of the host.10-01
    2. allow-query     { localhost; }; NOTE: delete localhost; and add any;.10-01
    3. Add a forward lookup zone.10-02
    4. Add a reverse lookup zone.10-02
  11. Enter the command named-checkconf to verify the named.conf file has not syntax errors.11
  12. Enter the command cd /var/named/chroot/var/named/ to navigate to the named directory.12
  13. Using a text editor create the zone file for a forward lookup. In this example it is noelalvarez.net.13
  14. Using a text editor create the zone file for reverse lookup. In this example it is the 67.205.160.0/24 IP address range.14
  15. Enter the command rndc reload to read the changes made to the named.conf and zone files.15
  16. Enter the command cd /etc to navigate to the etc directory.16
  17. Using a text editor, edit the resolv.conf file by adding configuring the server to use it’s IP address for name resolution.17
  18. Enter the command dig noelalvarez.net to query the name server for the A record of noelalvarez.net.18
  19. Additionally, you may use nslookup to query the name server for the various records that were created.19
  20. Lastly, you may query the name server from a host on an external network to verify it is a public facing DNS server.20

BIND – Create a Bind Zone File

You may use the following website to automatically create a BIND zone file.

Enjoy!


Linux – Configure a BIND Zone File

Domain Name System (DNS) is an essential part of any network. Berkeley Internet Name Domain (BIND) may be installed and configured on Linux CentOS and provide DNS name resolution. The configuration of BIND includes zone files. Below you will find a sample zone file for the domain name example.com. You may use this sample as a template and input the DNS records for your corresponding domain name.
01


Linux CentOS – -bash: updatedb: command not found

I recently installed Linux CentOS using the minimal install ISO. I attempted to use the updatedb command but I received the following error:

#updatedb
-bash: updatedb: command not found

The solution for this was to install mlocate.

# yum install mlocate -y

Installed:

mlocate.i686 0:0.22.2-3.el6

Complete!

Enjoy!


Linux CentOS – Configuring DNS Servers

You may use the following method to configure the Domain Name System (DNS) servers that Linux CentOS (http://www.centos.org/) will use. In this particular example the server will be configured to use the well known Google public DNS servers that utilize the following Internet Protocol (IP) addresses: 8.8.8. & 8.8.4.4.

Begin by logging into the server and elevating to the root user. You may verify the current user by issuing the whoami command.

# whoami root

Next, navigate to the /etc directory.

# cd /etc

# pwd /etc

Now, you may use the editor of your choice to edit the resolv.conf file. In this example I will be using the nano text editor.

# nano -w resolv.conf

Once the file opens use the following syntax to specify the name servers: nameserver IP Address (see the edited file below).

nameserver 8.8.8.8

nameserver 8.8.4.4

Close the editor by using ctrl+x and saving the file.

The file step is to test the configuration. This can be done by using the nslookup command to resolve a fully qualified domain name to an IP address.

# nslookup cnn.com Server: 8.8.8.8

Address: 8.8.8.8#53


Non-authoritative answer:

Name: cnn.com

Address: 157.166.226.25

Name: cnn.com

Address: 157.166.226.26

Name: cnn.com

Address: 157.166.255.18

Name: cnn.com

Address: 157.166.255.19

The fact that cnn.com is resolving to multiple IP addresses is most likely due to the fact that they are utilizing load balancing. Additionally, this completes the configuration.

Enjoy!


Linux CentOS – Routing Table Configuration

You may use the following method to add a static route to the routing table of a Linux server using the command line. The server in this example is running CentOS 5.5 64 bit.

I have decided to create a static route to Google.com but before doing so I need to find the Internet Protocol (IP) address of Google.com using the “host” command.

# host google.com
google.com has address 74.125.91.104
google.com has address 74.125.91.105
google.com has address 74.125.91.106
google.com has address 74.125.91.147
google.com has address 74.125.91.99
google.com has address 74.125.91.103
google.com mail is handled by 40 alt3.aspmx.l.google.com.
google.com mail is handled by 50 alt4.aspmx.l.google.com.
google.com mail is handled by 10 aspmx.l.google.com.
google.com mail is handled by 20 alt1.aspmx.l.google.com.
google.com mail is handled by 30 alt2.aspmx.l.google.com.

I will use the IP address 74.125.91.104 for this example.

First, we will view the current routing table of the Linux server using the “netstat -r” command.

# netstat -r
Kernel IP routing table
Destination Gateway Genmask Flags MSS Window irtt Iface
209.208.62.0 * 255.255.255.0 U 0 0 0 eth0
169.254.0.0 * 255.255.0.0 U 0 0 0 eth1
10.0.0.0 * 255.0.0.0 U 0 0 0 eth1
default 209.208.62.1 0.0.0.0 UG 0 0 0 eth0

Second, we will ping the IP address 74.125.91.104 to verify the network connection between these two devices is successful.

# ping -c 4 74.125.91.104
PING 74.125.91.104 (74.125.91.104) 56(84) bytes of data.
64 bytes from 74.125.91.104: icmp_seq=1 ttl=48 time=29.6 ms
64 bytes from 74.125.91.104: icmp_seq=2 ttl=48 time=29.6 ms
64 bytes from 74.125.91.104: icmp_seq=3 ttl=48 time=29.2 ms
64 bytes from 74.125.91.104: icmp_seq=4 ttl=48 time=29.2 ms

— 74.125.91.104 ping statistics —
4 packets transmitted, 4 received, 0% packet loss, time 3002ms
rtt min/avg/max/mdev = 29.257/29.451/29.668/0.256 ms

Third, I will purposely create a static route to route the IP address 74.125.91.104/24 to interface “eth 1″ which is a private interface and then change the static route to utilize the public interface “eth 0″.

# route add -net 74.125.91.0 netmask 255.255.255.0 dev eth1

Fourth, we will view the routing table to verify it has added the static route that was just configured.

# netstat -r
Kernel IP routing table
Destination Gateway Genmask Flags MSS Window irtt Iface
209.208.62.0 * 255.255.255.0 U 0 0 0 eth0
74.125.91.0 * 255.255.255.0 U 0 0 0 eth1
169.254.0.0 * 255.255.0.0 U 0 0 0 eth1
10.0.0.0 * 255.0.0.0 U 0 0 0 eth1
default 209.208.62.1 0.0.0.0 UG 0 0 0 eth0

Fifth, we will now ping the IP address 74.125.91.104 and it should not work due to the fact that eth 1 is a private interface and does not route to the internet.

# ping -c 4 74.125.91.104
PING 74.125.91.104 (74.125.91.104) 56(84) bytes of data.
From 10.0.24.1 icmp_seq=2 Destination Host Unreachable
From 10.0.24.1 icmp_seq=3 Destination Host Unreachable
From 10.0.24.1 icmp_seq=4 Destination Host Unreachable

— 74.125.91.104 ping statistics —
4 packets transmitted, 0 received, +3 errors, 100% packet loss, time 3000ms
, pipe 3

Sixth, we will now delete the static route and create a new one that will forward the traffic to network 74.125.91.0/24 out of eth 0 then view the routing table.

# route del -net 74.125.91.0 netmask 255.255.255.0 dev eth1
# route add -net 74.125.91.0 netmask 255.255.255.0 dev eth0
# netstat -r
Kernel IP routing table
Destination Gateway Genmask Flags MSS Window irtt Iface
209.208.62.0 * 255.255.255.0 U 0 0 0 eth0
74.125.91.0 * 255.255.255.0 U 0 0 0 eth0
169.254.0.0 * 255.255.0.0 U 0 0 0 eth1
10.0.0.0 * 255.0.0.0 U 0 0 0 eth1
default 209.208.62.1 0.0.0.0 UG 0 0 0 eth0

Lastly, we will ping the IP address 74.125.91.104 to verify the static route configuration is functioning correctly.

# ping -c 4 74.125.91.104
PING 74.125.91.104 (74.125.91.104) 56(84) bytes of data.
64 bytes from 74.125.91.104: icmp_seq=1 ttl=48 time=32.1 ms
64 bytes from 74.125.91.104: icmp_seq=2 ttl=48 time=28.7 ms
64 bytes from 74.125.91.104: icmp_seq=3 ttl=48 time=29.2 ms
64 bytes from 74.125.91.104: icmp_seq=4 ttl=48 time=29.3 ms

— 74.125.91.104 ping statistics —
4 packets transmitted, 4 received, 0% packet loss, time 3003ms
rtt min/avg/max/mdev = 28.780/29.884/32.131/1.321 ms

Enjoy!


CentOS

To learn more about Linux Community Enterprise Operating System (CentOS) then visit the official Linux CentOS website at www.centos.org.