Category: VMware ESXi 5.5

Microsoft Windows PowerShell – Get Host Architecture

You may use the following Microsoft Windows PowerShell script below to get the architecture, physical or virtual, of a Windows host on a network.

<#
.SYNOPSIS
This script will provide the architure (physical of virtual) of a host.
.DESCRIPTION
This script will provide the architure (physical of virtual) of a host.
.EXAMPLE
systeminfo /s $HOSTNAME | findstr /c:”Model:” /c:”Host Name”
.AUTHOR
Written by Noel Enrique Alvarez on Tuesday, April 23, 2019.
#>

#Requst the hostname of the host
$HOSTNAME = Read-Host “What is the hostname of the server?”

#Provide the architure of the host
systeminfo /s $HOSTNAME | findstr /c:”Model:” /c:”Host Name”


VMware ESXi 5.5 – Scripted Installation

The script below is a sample script that may be used to automate the installation of VMware ESXi 5.5. For more information click here.

#
# Sample scripted installation file
#
# Accept the VMware End User License Agreement
vmaccepteula
# Set the root password for the DCUI and Tech Support Mode
rootpw mypassword
# The install media is in the CD-ROM drive
install –firstdisk –overwritevmfs
# Set the network to DHCP on the first network adapater
network –bootproto=dhcp –device=vmnic0
# A sample post-install script
%post –interpreter=python –ignorefailure=true
import time
stampFile = open(‘/finished.stamp’, mode=’w’)
stampFile.write( time.asctime() )


VMware ESXi 5.5 – Domain Name System (DNS) and Routing Configuration

You may use the following method to configure the Domain Name System (DNS) server(s) for a VMware ESXi 5.5 host.

1. Connect to the VMware ESXi host using the VMware vSphere Client.

01


2. In the VMware vSphere Client 5.5 navigate to Configuration > DNS and Routing and click Properties….

02

3. In the DNS and Routing Configuration dialog box on the DNS Configuration tab enter all of the configuration information for the host.

03


4. In the DNS and Routing Configuration dialog box on the Routing tab verify that the Default gateway: is configured correctly then click OK.

04


5. In the Gateway Not Specified dialog box you may safely click Yes if you are not using IPv6.

05


6. The DNS and Routing page should now display all of the correct settings.

06

Enjoy!


VMware ESXi 5.5 – Network Time Protocol (NTP) Configuration

You may use the following method to configure the Network Time Protocol (NTP) on a VMware ESXi 5.5 host.

1. Connect to the VMware ESXi 5.5 host using the VMware vSphere Client 5.5.

01


2. In the VMware vSphere Client 5.5 navigate to Configuration > Time Configuration and on the Time Configuration screen click Properties….

02


3. In the Time Configuration dialog box manually configure the date and time then select the check box next to NTP Client Enabled then click Options….

03


4. In the NTP Daemon (ntpd) Options dialog box select the NTP Settings option and add the NTP servers and select the check box to Restart NTP server to apply changes. Next, select the General tab then the option to Start automatically if any ports are open, and stop when all ports are closed then click OK.

04-1

04-2


5. In the Time Configuration dialog box click OK.

05


6. The Time Configuration screen should show the correct time, data, NTP Client status as Running and the NTP Servers you configured.

06


Enjoy!


VMware ESXi 5.5 – Management Network Configuration

You may use the following method to configure the management network on a VMware ESXi 5.5 host.


1. On the VMware Direct Console User Interface (DCUI) press F2.

09

2. In the Authentication Required dialog box enter the root password then hit enter.

10


3. On the System Customization screen select Configure Management Network.

11

4. On the Configure Management Network screen verify the Network Adapters.

12

5. On the Configure Management Network screen select IP Configuration.

13

6. In the IP Configuration dialog box configure the static Internet Protocol (IP) address.

14


7. On the Configure Management Network screen hit Esc.

15

8. In the Configure Management Network: Confirm dialog box hit Y to apply the changes to the management network.

16


9. On the System Customization screen select Test Management Network.

17

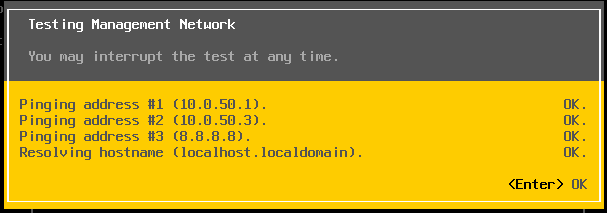
10. In the Test Management Network dialog box enter up to (3) IP addresses to test network connectivity then hit Enter.

18


18-2


11. Verify that the IP address on the DCUI is correct.

19


Enjoy!


VMware ESXi 5.5 – Interactive Installation

You may use the following method to perform an interactive installation and configuration of a VMware ESXi 5.5 host.

1. On the ESXi-5.5.0-20140902001-standard Boot Menu page select ESXi-5.5.0-20140902001-standard Installer.

01


2. In the Welcome to the VMware ESXi 5.5.0 Installation dialog box hit Enter to continue.

02


3. In the End User License Agreement (EULA) dialog box  hit F11 to accept the EULA.

03


4. In the Select a Disk to Install or Upgrade dialog box verify that the correct hard disk is selected then hit Enter to continue.

04


5. In the Please select a keyboard layout dialog box select US Default then hit Enter to continue.

05


6. In the Enter a root password dialog box enter a password then hit Enter.

06


7. In the Confirm Install dialog box hit F11.

07


8. In the Installation Complete dialog box hit Enter to reboot the server.

08


Enjoy!


VMware ESXi 5.5 – Interactive Installation and Configuration Checklist

VMware ESXi 5.5 Installation

1. Verify that the host server’s BIOS hardware clock is configure to use UTC±0.

2. Select the correct disk to install VMware ESXi 5.5.

3. Select a keyboard layout.

4. Enter a password for the VMware ESXi root account.

5. Remove bootable media upon the completion of the installation.


Management Network Configuration

1. Configure the management network (with NIC teaming).

2. Test management network.

3. Verify the Internet Protocol (IP) address on the Direct Console User Interface (DCUI) is correct.


Network Time Protocol (NTP) Configuration

1. Install the VMware vSphere client 5.5.

2. Configure NTP on the VMware ESXi 5.5 host.


Domain Name System (DNS)  and Routing Configuration

1. Configure the DNS servers using the VMware vSphere client 5.5.

2. Verify the default gateway is configured correctly.

3. Create Domain Name System (DNS) records for the host on your DNS server(s).


VMware ESXi 5 – iSCSI Configuration

You may use the following method to connect your VMware ESXi 5.x host to an iSCSI SAN. Please keep in mind that this post assumes you have configured the SAN to allow the VMware host access to the appropriate LUN(s).

After logging into the vSphere Client navigate to Configuration > Networking then click Add Networking.

00

Under Connection Types select VMkernel then click Next >.

01

Select the vmnic that will be used for iSCSI traffic then click Next >. In this example it is vmnic0.

02

Type iSCSI for the Network Label: setting then click Next >.

03

Select Use the following IP settings: and enter the correct Internet Protocol (IP) address and subnet mask for your particular network then click Next > (no VMkernel Default Gateway: setting is necessary because the iSCSI traffic will exist on the same local network). In this example the IP address is 192.168.31.82 and the subnet mask is 255.255.255.0. The iSCSI traffic will exist on the 192.168.31.0/24 network.

04

On the Ready to Complete page click Finish.

05

On the  Configuration > Networking page you will now see a new switch labeled Standard Switch: vSwitch 1.

06

Next, navigate to Configuration > Storage Adapters. Right click the iSCSI Software Adapter (vmhbaxx) and select Properties….

07

Under the Network Configuration tab click Add….

08

Under Port Group select iSCSI (vSwitch 1) and click OK.

09

On the Dynamic Discovery tab click Add….

10

In the iSCSI Server: field type the IP address of the iSCSI target server then click OK. In this example it is 192.168.31.91.

11

The IP address of the iSCSI targer server should now be visible under the Dynamic Discovery and Static Discovery tab. If so, click Close.

12

13

Select Yes when prompted to rescan the host bus adapter.

14

Under the Details section of the window you should now see the LUN(s) that have been configured for use.

15

Next, navigate to Configuration > Storage then click Add Storage….

16

Under Storage Type select Disk/LUN then click Next >.

17

Select the LUN(s) then click Next >.

18

Under File System Version select VMFS-5 then click Next >.

19

After reviewing the configuration click Next >.

20

Enter a datastore name that will identify the datastore then click Next >. In this I chose openfiler01 because that is the hostname of the iSCSI SAN used in this example.

21

Under Capacity select Maximum available space then click Next >.

22

On the Disk layout: page click Finish.

23

After the VMFS datastore is created it will be visible on the Configuration > Storage page.

24

Now when you create virtual machines you may store them on this VMFS datastore.

This completes the process.

Enjoy!