You may add the following line to the virtual machine’s configuration file (.vmx) to provide a (5) second delay from the initial post screen to enter the virtual machines BIOS settings.
bios.bootDelay = “5000”
Enjoy!
You may add the following line to the virtual machine’s configuration file (.vmx) to provide a (5) second delay from the initial post screen to enter the virtual machines BIOS settings.
bios.bootDelay = “5000”
Enjoy!
You may use the following method to configure port security on a Cisco switch. Additionally, this configuration will not use the switchport port-security violation {protect | restrict | shutdown} command in order to accept the default action of shutdown.
1. Verify the existing configuration, if any, exists on the switch port.
2. Navigate to the interface configuration prompt of the interface you would like to configure.
3. Enter the switchport mode access command.
4. Enter the switchport port-security command to enable port security.
5. Enter the switchport port-security maximum x command to define the maximum number of MAC addresses to define where x is the number of MAC address to define. The default value is to accept a maximum of (1) MAC address. In this example the maximum number is (2).
6. Enter the switchport port-security mac-address sticky to allow the switch to dynamically learn the first (2) MAC addresses.
7. Verify the port security configuration using the show running-config command or the show port-security interface FastEthernet 0/1 command.
Enjoy!
You may use the following method to configure the Domain Name System (DNS) server(s) for a VMware ESXi 5.5 host.
1. Connect to the VMware ESXi host using the VMware vSphere Client.

2. In the VMware vSphere Client 5.5 navigate to Configuration > DNS and Routing and click Properties….

3. In the DNS and Routing Configuration dialog box on the DNS Configuration tab enter all of the configuration information for the host.

4. In the DNS and Routing Configuration dialog box on the Routing tab verify that the Default gateway: is configured correctly then click OK.

5. In the Gateway Not Specified dialog box you may safely click Yes if you are not using IPv6.

6. The DNS and Routing page should now display all of the correct settings.

Enjoy!
You may use the following method to configure the Network Time Protocol (NTP) on a VMware ESXi 5.5 host.
1. Connect to the VMware ESXi 5.5 host using the VMware vSphere Client 5.5.

2. In the VMware vSphere Client 5.5 navigate to Configuration > Time Configuration and on the Time Configuration screen click Properties….

3. In the Time Configuration dialog box manually configure the date and time then select the check box next to NTP Client Enabled then click Options….

4. In the NTP Daemon (ntpd) Options dialog box select the NTP Settings option and add the NTP servers and select the check box to Restart NTP server to apply changes. Next, select the General tab then the option to Start automatically if any ports are open, and stop when all ports are closed then click OK.


5. In the Time Configuration dialog box click OK.

6. The Time Configuration screen should show the correct time, data, NTP Client status as Running and the NTP Servers you configured.

Enjoy!
You may use the following method to configure the management network on a VMware ESXi 5.5 host.
1. On the VMware Direct Console User Interface (DCUI) press F2.

2. In the Authentication Required dialog box enter the root password then hit enter.

3. On the System Customization screen select Configure Management Network.

4. On the Configure Management Network screen verify the Network Adapters.

5. On the Configure Management Network screen select IP Configuration.

6. In the IP Configuration dialog box configure the static Internet Protocol (IP) address.

7. On the Configure Management Network screen hit Esc.

8. In the Configure Management Network: Confirm dialog box hit Y to apply the changes to the management network.

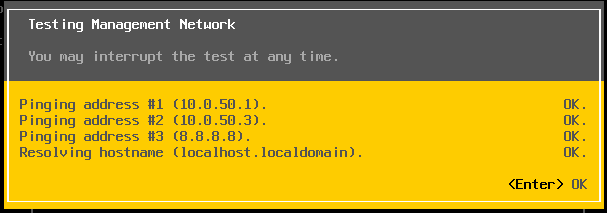
9. On the System Customization screen select Test Management Network.

10. In the Test Management Network dialog box enter up to (3) IP addresses to test network connectivity then hit Enter.


11. Verify that the IP address on the DCUI is correct.

Enjoy!
You may use the following method to perform an interactive installation and configuration of a VMware ESXi 5.5 host.
1. On the ESXi-5.5.0-20140902001-standard Boot Menu page select ESXi-5.5.0-20140902001-standard Installer.

2. In the Welcome to the VMware ESXi 5.5.0 Installation dialog box hit Enter to continue.

3. In the End User License Agreement (EULA) dialog box hit F11 to accept the EULA.

4. In the Select a Disk to Install or Upgrade dialog box verify that the correct hard disk is selected then hit Enter to continue.

5. In the Please select a keyboard layout dialog box select US Default then hit Enter to continue.

6. In the Enter a root password dialog box enter a password then hit Enter.

7. In the Confirm Install dialog box hit F11.

8. In the Installation Complete dialog box hit Enter to reboot the server.

Enjoy!
VMware ESXi 5.5 Installation
1. Verify that the host server’s BIOS hardware clock is configure to use UTC±0.
2. Select the correct disk to install VMware ESXi 5.5.
3. Select a keyboard layout.
4. Enter a password for the VMware ESXi root account.
5. Remove bootable media upon the completion of the installation.
Management Network Configuration
1. Configure the management network (with NIC teaming).
2. Test management network.
3. Verify the Internet Protocol (IP) address on the Direct Console User Interface (DCUI) is correct.
Network Time Protocol (NTP) Configuration
1. Install the VMware vSphere client 5.5.
2. Configure NTP on the VMware ESXi 5.5 host.
Domain Name System (DNS) and Routing Configuration
1. Configure the DNS servers using the VMware vSphere client 5.5.
2. Verify the default gateway is configured correctly.
3. Create Domain Name System (DNS) records for the host on your DNS server(s).
Copyright © 2025, Noel Alvarez. Proudly powered by WordPress. Blackoot design by Iceable Themes.