Domain Name System (DNS) is an essential part of any network. Berkeley Internet Name Domain (BIND) may be installed and configured on Linux CentOS and provide DNS name resolution. The configuration of BIND includes zone files. Below you will find a sample zone file for the domain name example.com. You may use this sample as a template and input the DNS records for your corresponding domain name.

Linux – Configure a BIND Zone File
Microsoft Hyper-V – Create a Virtual Switch using a PowerShell Script
Microsoft Hyper-V allows you to create (3) types of virtual switches (External, Internal and Private). These virtual switches may be created manually using the Hyper-V Manager or you may use a PowerShell (.ps1) script to automate the process. Below you will find a script to create an External virtual switch.
1. Issue the Get-NetAdapter command to provide a list of physical network interface (NIC) card(s) on the host. Take note of the name of the NIC that will be used for the external virtual switch.

2. You may modify the script below to create an external virtual switch.
3. Run Microsoft Powershell (as an Administrator) to create the external virtual switch.
4. Lastly, verify the creation of the virtual switch using the Hyper-V Manager > Virtual Switch Manager.
Microsoft Hyper-V – Install Hyper-V and the Management Tools using PowerShell
Microsoft allows you to install the Hyper-V role using PowerShell (run as an administrator) as well as the graphical user interface (GUI). One of the advantages of using PowerShell is that you can create a script to deploy a large number of Hyper-V hosts. During my initial testing I was able to install the Hyper-V role but the Management Tools were not being installed. The PowerShell installation requires the -IncludeManagementTools parameter to install the Management Tools.
The command to install both the Hyper-V role and the Management Tools is as follows:
Install-WindowsFeature –Name Hyper-V -ComputerName <computer_name> -IncludeManagementTools -Restart
If you will be installing the Hyper-V role on the local host then remove the -ComputerName <computer_name> parameter.
Microsoft provides great documentation for their solutions and the Install the Hyper-V Role and Configure a Virtual Machine document is no exception.
Enjoy!
Microsoft – Infrastructure Planning and Design Guide Series
When you are implementing any technological solution it is important to plan properly. The Microsoft Infrastructure Planning and Design Guide Series is a great set of documents that will assist you in your planning.
Enjoy!
Windows Server 2012 R2 – iSCSI Initiator Configuration
You may use the following method to configure the iSCSI Initiator in Windows Server 2012 R2.
1. Click Start then select Administrative Tools.
2. Double click the iSCSI Initiator icon and in the Microsoft iSCSI dialog box click Yes.
3. On the Targets tab type the Internet Protocol (IP) address of the iSCSI Target (in this example it is 192.168.31.91) in the Quick Connect box then click Quick Connect. In the Quick Connect dialog box verify that the Status says Connected and that the Progress report says Login Succeeded. Then, click Done.
4. On the Volumes and Devices tab click Auto Configure then click OK.
5. On the desktop right click the Windows icon and select Disk Management.
6. In the Disk Management console right click the Logical Unit Number (LUN) and click Online.
7. Right click the LUN and select New Simple Volume.
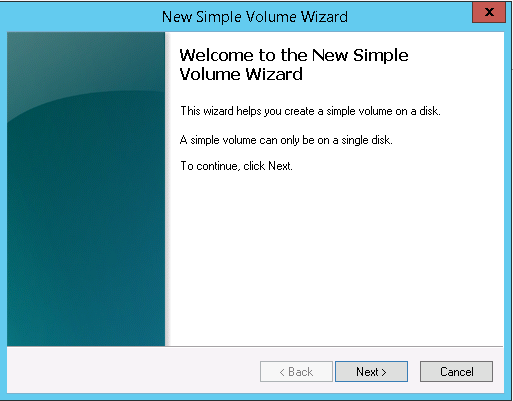
8. In the New Simple Volume Wizard click Next >.
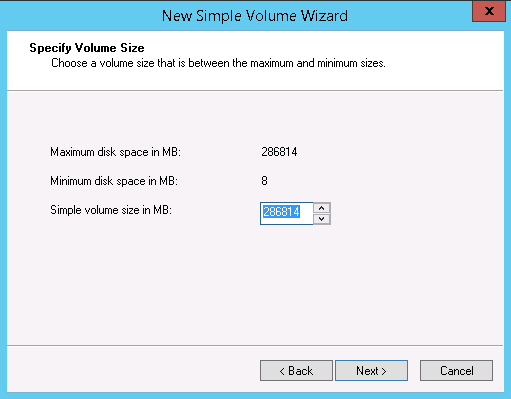
9. On the Specify Volume Size page click Next >.
10. On the Assign Drive Letter or Path page click Next >.
11. On the Format Partition page change the Volume label: from New Volume to iSCSI (or you may leave it default) then click Next >.
12. On the Completing the New Simple Volume Wizard page click Finish.
13. Right click the LUN and click Change Drive Letter and Paths….
14. On the Change Drive Letter and Paths for iSCSI click Add…. On the Add Drive Letter or Path dialog box click OK.
15. On the desktop right click the Windows icon and select File Explorer.
16. The iSCSI LUN is now available for use.
Enjoy!
Microsoft Active Directory – Windows Server 2012 R2 Domain Controller (DC) Deployment
You may use the following steps to configure Windows Server 2012 R2 as a Microsoft Active Directory Domain Controller.
1. On the Server Manager page click Add roles and features.
2. Click Next > on the Add Roles and Features Wizard page.
3. Select Role-based or feature-based installation on the Installation Type page.
4. On the Server Selection page select the correct server (in this example it is DC01) and click Next >.
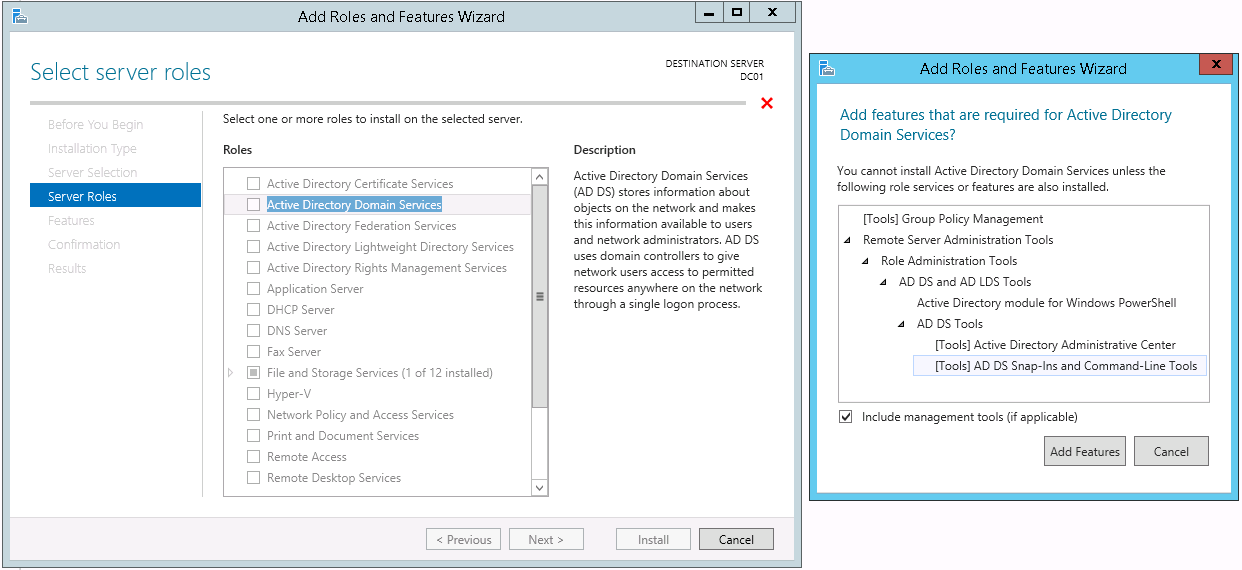
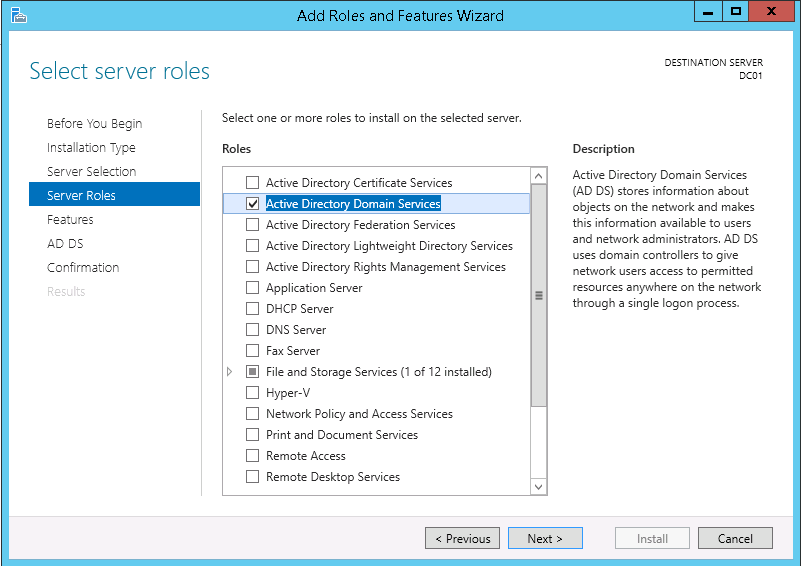
5. On the Server Roles page select Active Directory Domain Services. When asked to Add features that are required for Active Directory Domain Services? click Add Features. Then, on the Server Roles page click Next >.
6. On the Features page click Next >.
7. On the AD DS page click Next >.
8. On the Confirmation page select the option to Restart the destination server automatically if required and click Install.
9. On the Results page click Close.
10. On the Server Manager select the notification icon then click Promote this server to a domain controller.
11. On the Deployment Configuration tab select Add a new forest and specify the Root domain name:, in this example it is ROOT.SYSADMIN.NET, then click Next >.
12. On the Domain Controller Options tab select Windows Server 2012 R2 as the Forest functional level: and Domain functional level:. Additionally, choose a Directory Services Restore Mode (DSRM) password then click Next >.
13. On the DNS Options tab click Next >.
14. On the Additional Options tab choose the default NetBIOS domain name: and click Next >.
15. On the Paths tab select Next >.
16. On the Review Options tab click Next >.
17. On the Prerequisites Check tab click Install (the server will restart).
18. Lastly, verify that the Active Directory Domain Service is running correctly by verifying the existence of Active Directory Domain Services Event IDs 1000 & 1394.
Enjoy!
-
Recent Posts
Categories
- Amazon CloudWatch
- Amazon Elastic Compute Cloud
- Amazon Virtual Private Cloud
- Amazon Web Services
- Ansible
- Apache
- Architecture
- Automation
- AWS Command Line Interface
- AWS Identity and Access Management
- Backups
- Barracuda Networks
- BIND
- BIOS
- Brocade
- Certification
- Cisco
- Cisco Unified Computing System
- Dell
- Dell Compellent
- Dell Lifecycle Controller
- Dell OpenManage Essentials 2.1
- Dell PowerEdge R630
- Distributed File System
- Documentation
- Domain Name System
- Dynamic Host Configuration Protocol
- EIGRP
- Fibre Channel
- File Services
- GitHub
- IEEE 802.1q
- Integrated Dell Remote Access Controller 8
- Intel
- Internet Information Services
- iSCSI
- Linksys
- Linktree
- Linux
- Microsoft Active Directory
- Microsoft Deployment Toolkit 2013
- Microsoft Exchange Management Shell
- Microsoft Exchange Server 2013
- Microsoft Exchange Server 2016
- Microsoft Failover Clustering
- Microsoft Group Policy Object
- Microsoft Hyper-V
- Microsoft Office 365
- Microsoft Windows 10
- Microsoft Windows Command Prompt
- Microsoft Windows PowerShell
- Microsoft Windows Server 2016
- Microsoft Windows Storage Server 2012
- Migration
- Multipath I/O
- Network
- Network Time Protocol
- Notepad++
- OSPF
- Python
- Red Hat Enterprise Linux 7
- RIP
- Scripting
- Service Account
- Services
- Storage Area Network
- Symantec Backup Exec 2012
- Symantec Endpoint Protection
- Technical Utilities
- Telnet
- Terraform
- Ubuntu
- Uncategorized
- Virtualization
- VLANS and Trunking
- VMware
- VMware ESXi 5.5
- VMware ESXi 6.0
- VMware ESXi 6.5
- VMware ESXi 6.7
- VMware PowerCLI
- VMware vCenter Converter
- VMware vCenter Server 5.0
- VMware vCenter Server 6
- VMware vCenter Server 6.0
- VMware vCenter Server 6.5
- VMware vCenter Server 6.7
- VMware vSphere 5.0
- VMware vSphere 6.0
- VMware vSphere 6.5
- VMware vSphere Update Manager 6.0
- VMware Workstation 11
- Windows Server 2019
- Windows Server Update Services
- Wireless Networking
Archives
- April 2023
- June 2022
- March 2022
- February 2022
- November 2020
- September 2020
- July 2020
- May 2020
- April 2020
- March 2020
- January 2020
- November 2019
- October 2019
- September 2019
- June 2019
- May 2019
- April 2019
- December 2018
- November 2018
- October 2018
- September 2018
- August 2018
- July 2018
- June 2018
- May 2018
- April 2018
- November 2017
- September 2017
- July 2017
- March 2017
- February 2017
- January 2017
- December 2016
- November 2016
- October 2016
- August 2016
- July 2016
- June 2016
- May 2016
- April 2016
- March 2016
- February 2016
- December 2015
- November 2015
- October 2015
- July 2015
- June 2015
- May 2015
- April 2015
- March 2015
- January 2015
- December 2014
- November 2014
- October 2014
- August 2014
- July 2014
- March 2014
- February 2014
- January 2014
- December 2013
- November 2013
- October 2013
- September 2013
- August 2013
- July 2013
- June 2013
- May 2013
- December 2012
- November 2012
- June 2012
- May 2012
- April 2012
Meta


