You may use the following commands to export and import a Dynamic Host Configuration Protocol (DHCP) configuration for a server utilizing Microsoft Windows Server 2012 R2.
netsh dhcp server dump > dhcpconfig.dmp
netsh exec dhcpconfig.dmp
Enjoy!
You may use the following commands to export and import a Dynamic Host Configuration Protocol (DHCP) configuration for a server utilizing Microsoft Windows Server 2012 R2.
netsh dhcp server dump > dhcpconfig.dmp
netsh exec dhcpconfig.dmp
Enjoy!
You may use the Microsoft Windows PowerShell (.ps1) script below to configure NIC teaming in Microsoft Windows Server 2012 R2. Additionally, you may modify the script to meet the needs of your specific environment.
<#
.SYNOPSIS
This script will configure NIC1 and NIC2 to (1) Gbps Full Duplex, disable NIC3 and NIC4, create NIC Team 1 and configure NIC Team 1 TCP/IP settings.
.DESCRIPTION
This script will automate the configuration of Microsoft Windows Server 2012 R2 NIC Teaming.
.EXAMPLE
N/A.
.AUTHOR
Written by Noel Enrique Alvarez on Tuesday, November 10, 2015.
#>
#Request the Internet Protocol (IP) address of the server
$IP_Address = Read-Host “What is the Internet Protocol (IP) address of the server?”
#Configure NIC1 and NIC2 to 1 Gbps Full Duplex
Set-NetAdapterAdvancedProperty NIC1 -DisplayName “Speed & Duplex” -DisplayValue “1.0 Gbps Full Duplex”
Set-NetAdapterAdvancedProperty NIC2 -DisplayName “Speed & Duplex” -DisplayValue “1.0 Gbps Full Duplex”
#Disable NIC3 and NIC4
Disable-NetAdapter -Name “NIC3” -Confirm:$false
Disable-NetAdapter -Name “NIC4” -Confirm:$false
#Create NIC Team 1
New-NetLbfoTeam -Name “Team 1” -TeamMembers NIC1,NIC2 -TeamNicName “TEAM 1” -TeamingMode SwitchIndependent -LoadBalancingAlgorithm Dynamic -Confirm:$false
#Configure NIC Team 1 TCP/IP settings
Get-NetAdapter -Name “Team 1” | Set-NetIPInterface -DHCP Disabled
Start-Sleep 5
Get-NetAdapter -Name “Team 1” | New-NetIPAddress -AddressFamily IPv4 -IPAddress $IP_Address -PrefixLength “XX” -Type Unicast -DefaultGateway “X.X.X.X”
Set-DnsClientServerAddress -InterfaceAlias “Team 1” -ServerAddresses “X.X.X.X”, “X.X.X.X”
#End of script
You may use the following global configuration command to remove VLANs 2-1001 on a Cisco switch. This range is chosen because VLANS 1, 1002, 1003, 1004 and 1005 cannot be removed from a Cisco switch. This command may be used when a switch’s configuration needs to be deleted, in addition to erase startup-config, for a new deployment.
switch-01(config)#no vlan 2-1001
You may use the following Microsoft Windows PowerShell commands, as an administrator, to configure the network time protocol (NTP) servers for Windows Server 2012 R2 and sync a Windows client, such as Microsoft Windows 7, to the server. This example is using the well known NTP servers from the NTP Pool Project.
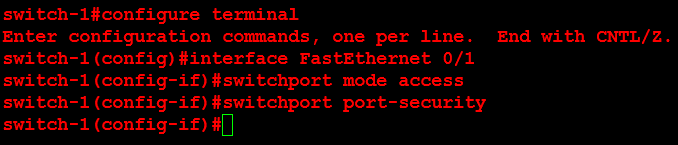
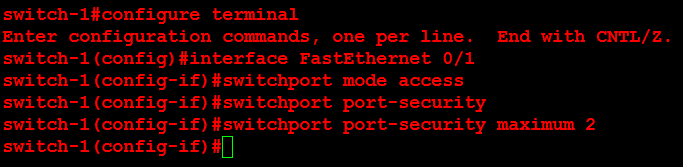
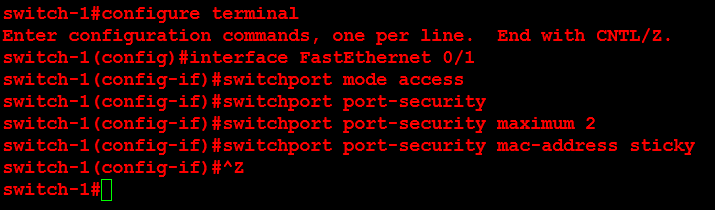
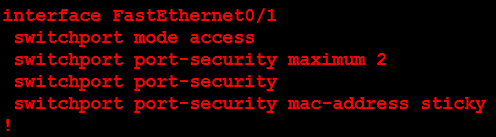
You may use the following method to configure port security on a Cisco switch. Additionally, this configuration will not use the switchport port-security violation {protect | restrict | shutdown} command in order to accept the default action of shutdown.
1. Verify the existing configuration, if any, exists on the switch port.
![]()
2. Navigate to the interface configuration prompt of the interface you would like to configure.

3. Enter the switchport mode access command.

4. Enter the switchport port-security command to enable port security.
5. Enter the switchport port-security maximum x command to define the maximum number of MAC addresses to define where x is the number of MAC address to define. The default value is to accept a maximum of (1) MAC address. In this example the maximum number is (2).
6. Enter the switchport port-security mac-address sticky to allow the switch to dynamically learn the first (2) MAC addresses.
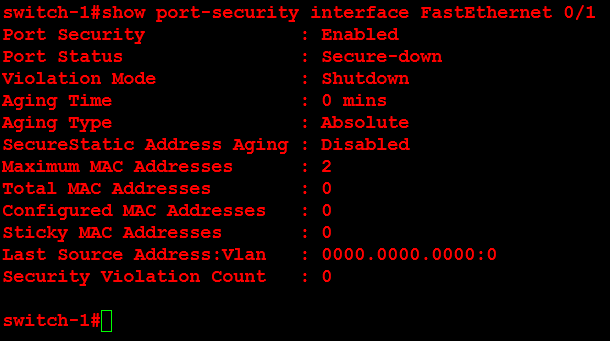
7. Verify the port security configuration using the show running-config command or the show port-security interface FastEthernet 0/1 command.
Enjoy!
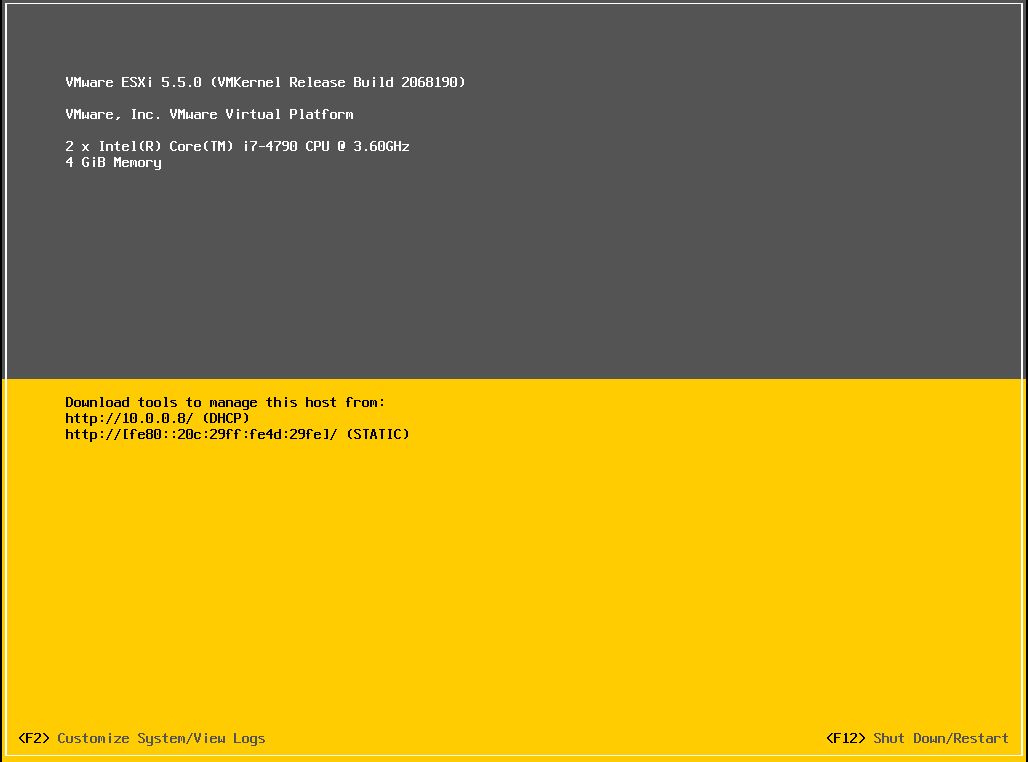
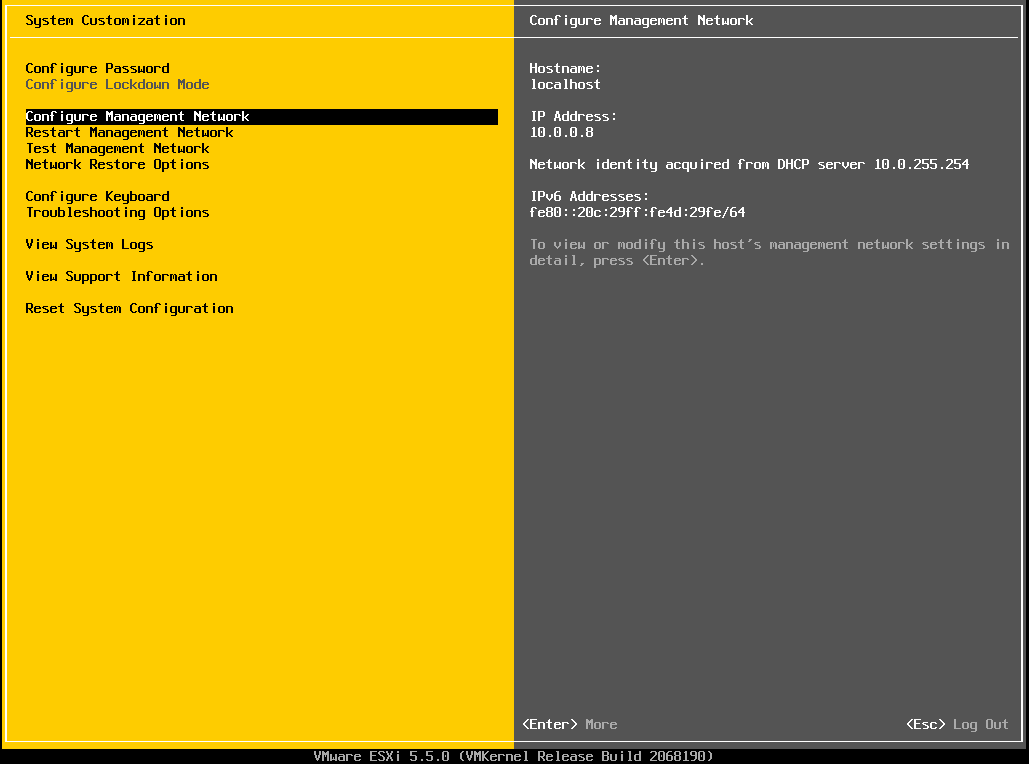
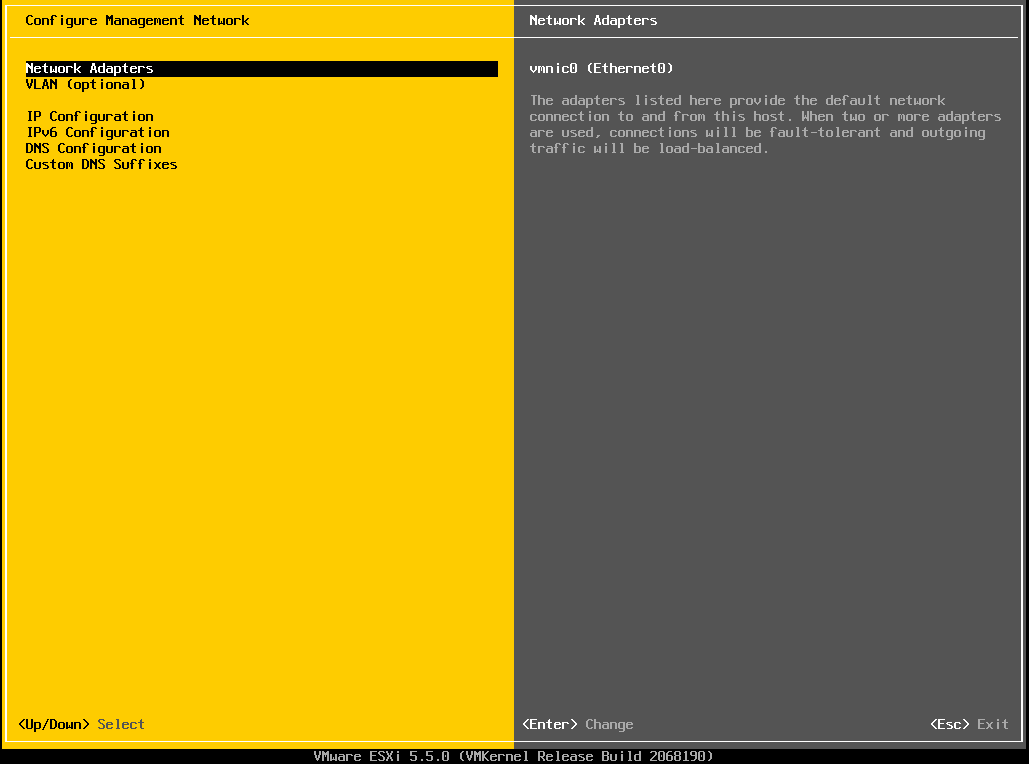
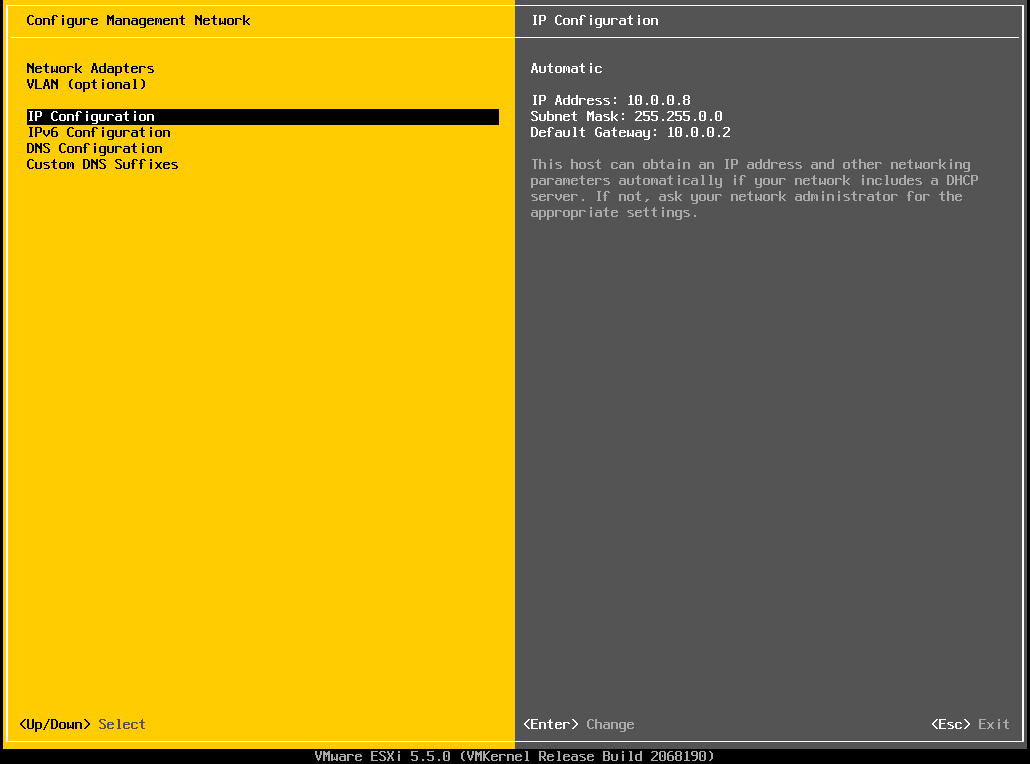
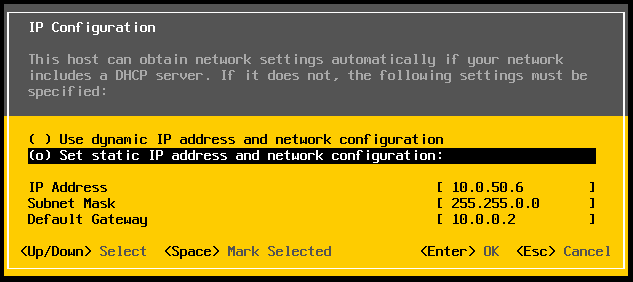
You may use the following method to configure the management network on a VMware ESXi 5.5 host.
1. On the VMware Direct Console User Interface (DCUI) press F2.
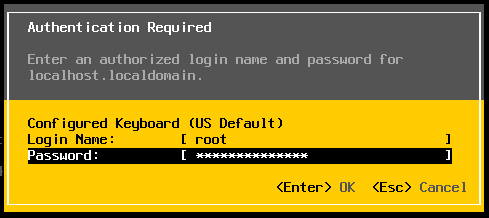
2. In the Authentication Required dialog box enter the root password then hit enter.
3. On the System Customization screen select Configure Management Network.
4. On the Configure Management Network screen verify the Network Adapters.
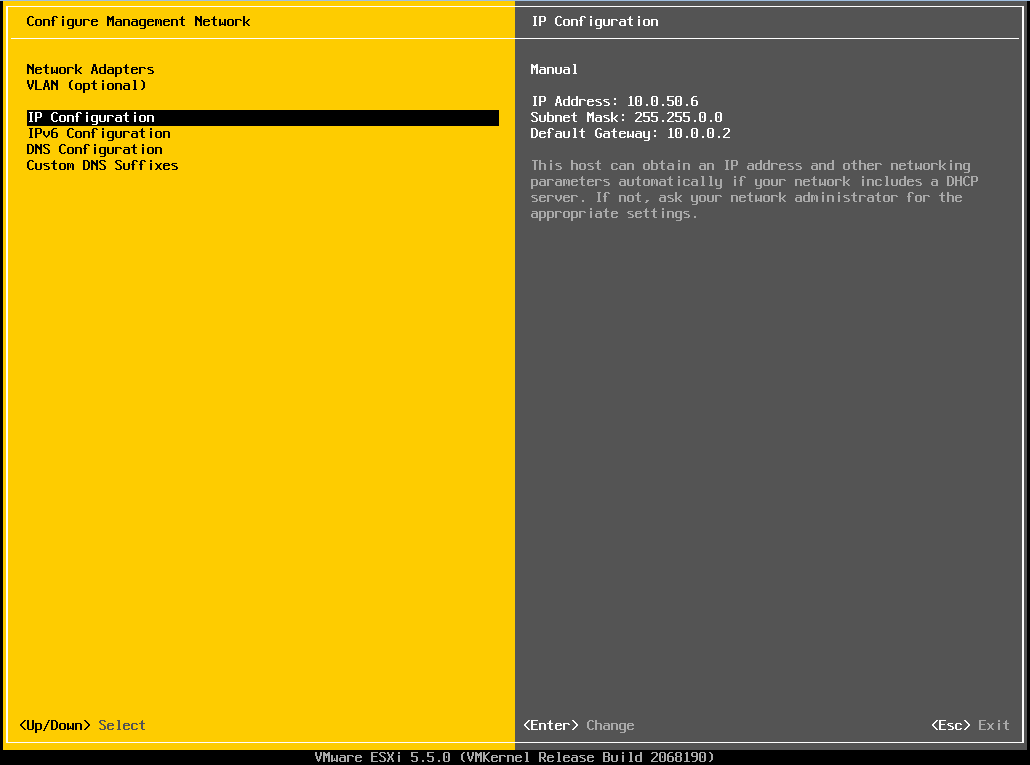
5. On the Configure Management Network screen select IP Configuration.
6. In the IP Configuration dialog box configure the static Internet Protocol (IP) address.
7. On the Configure Management Network screen hit Esc.
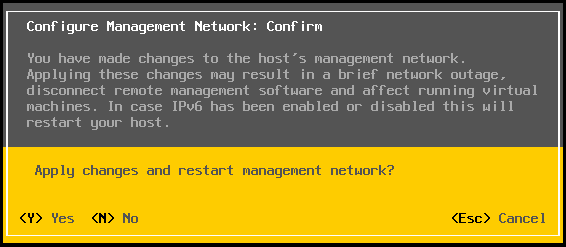
8. In the Configure Management Network: Confirm dialog box hit Y to apply the changes to the management network.
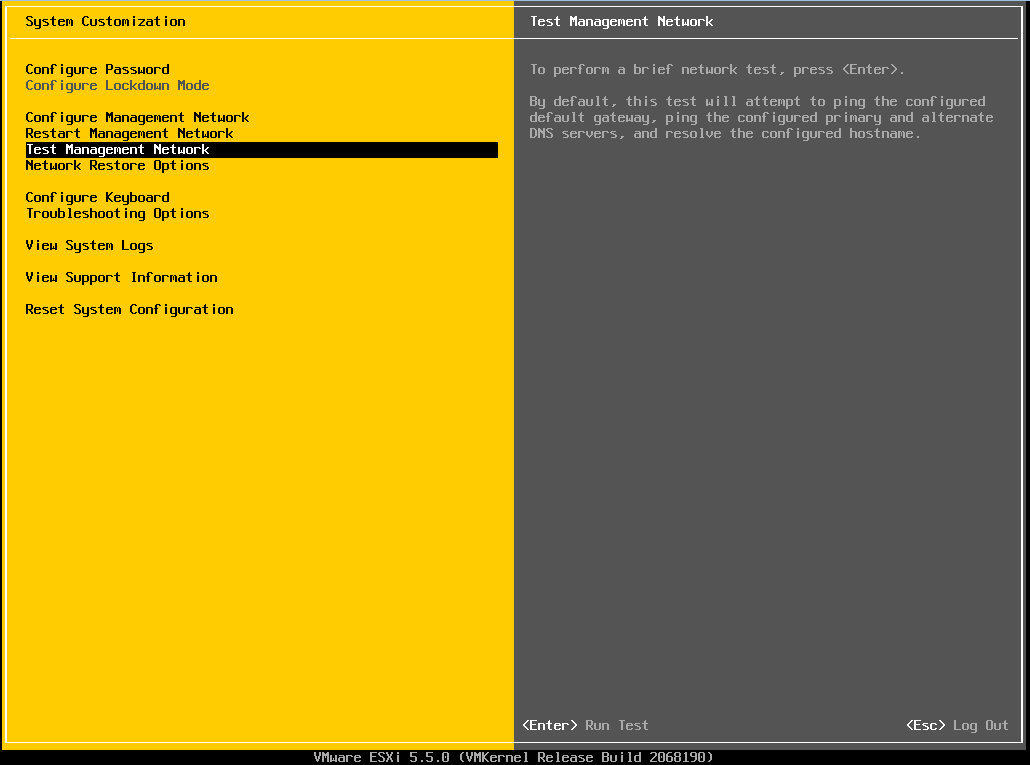
9. On the System Customization screen select Test Management Network.
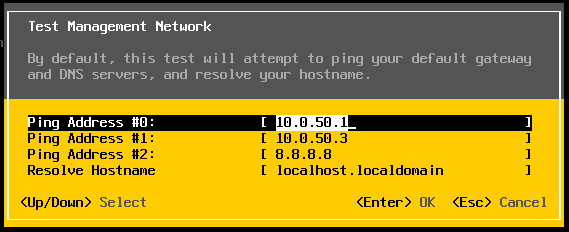
10. In the Test Management Network dialog box enter up to (3) IP addresses to test network connectivity then hit Enter.
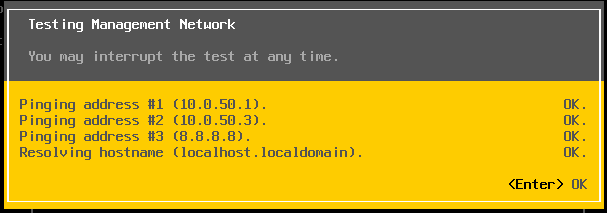
11. Verify that the IP address on the DCUI is correct.
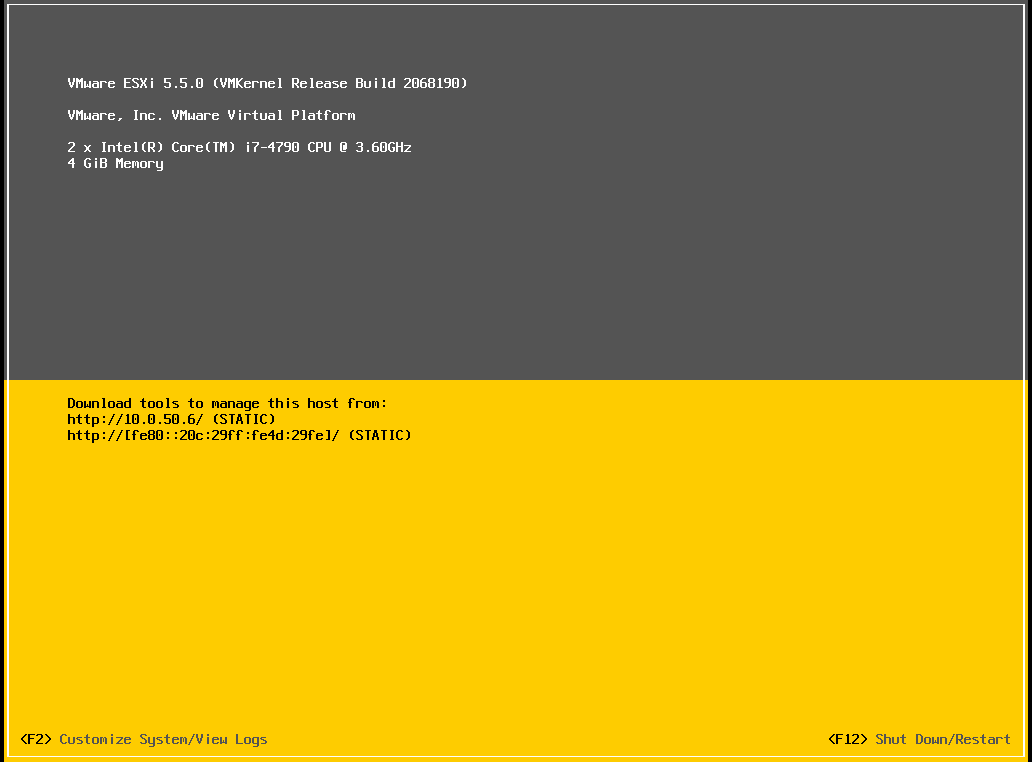
Enjoy!
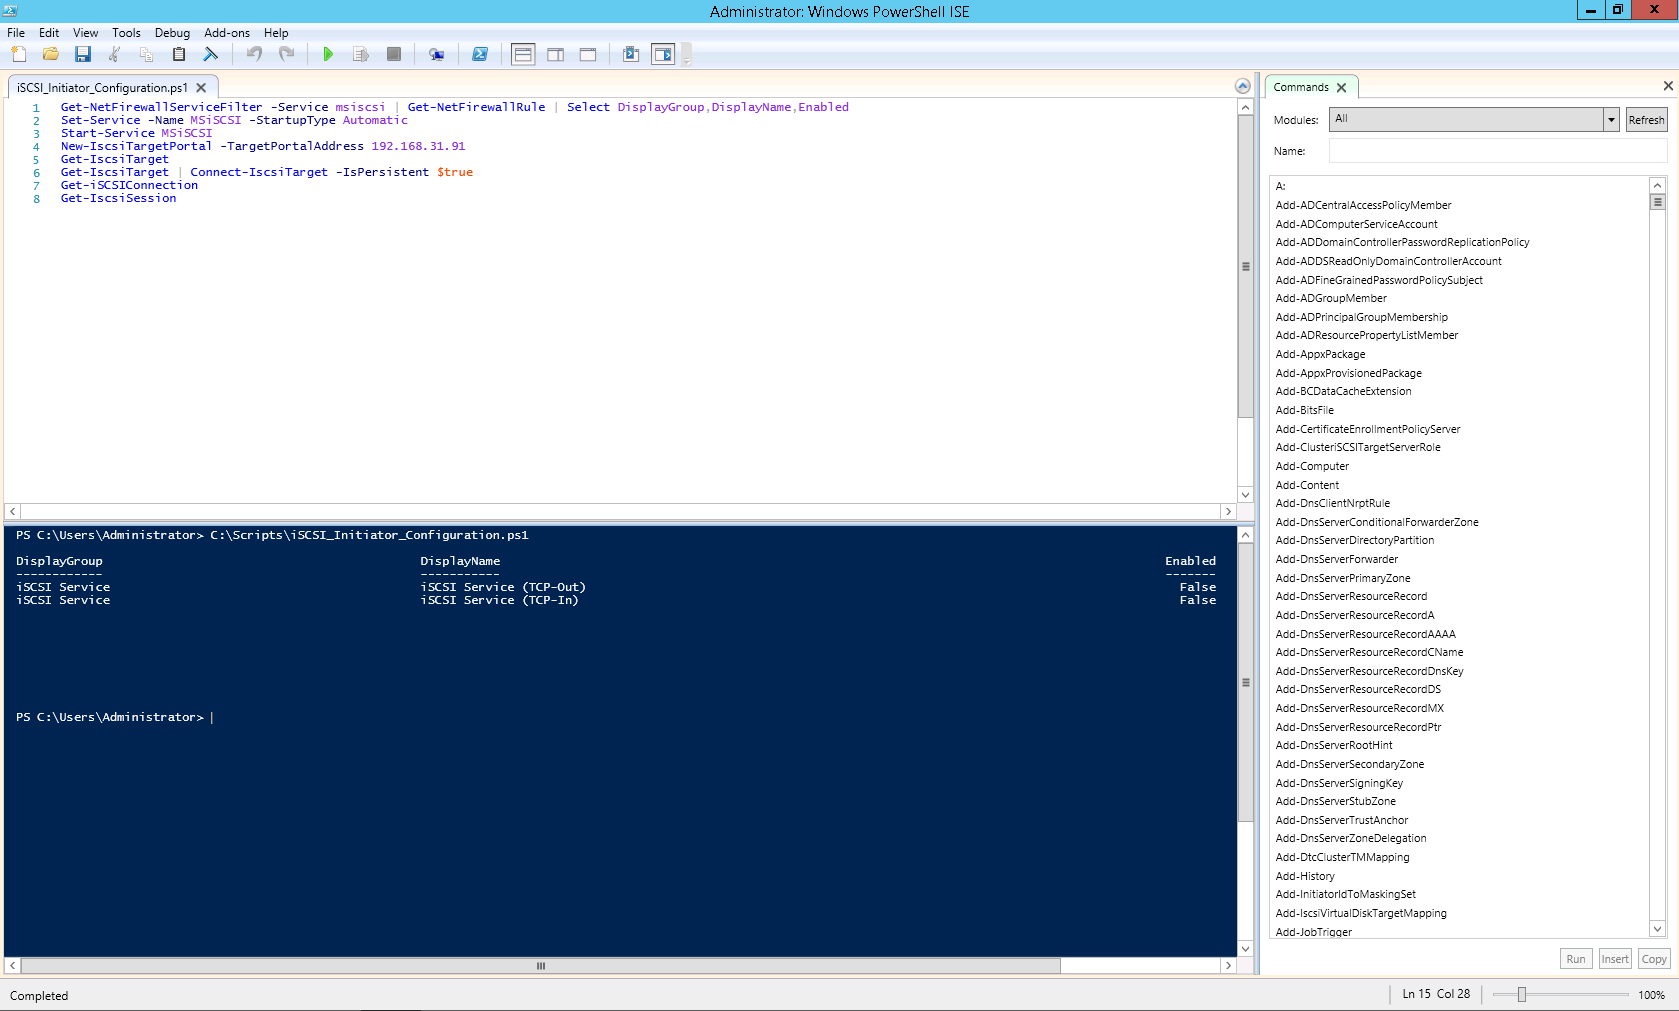
You may modify the script below to automate the process of configuring an iSCSI Initiator with the Windows Server 2012 R2 operating system.
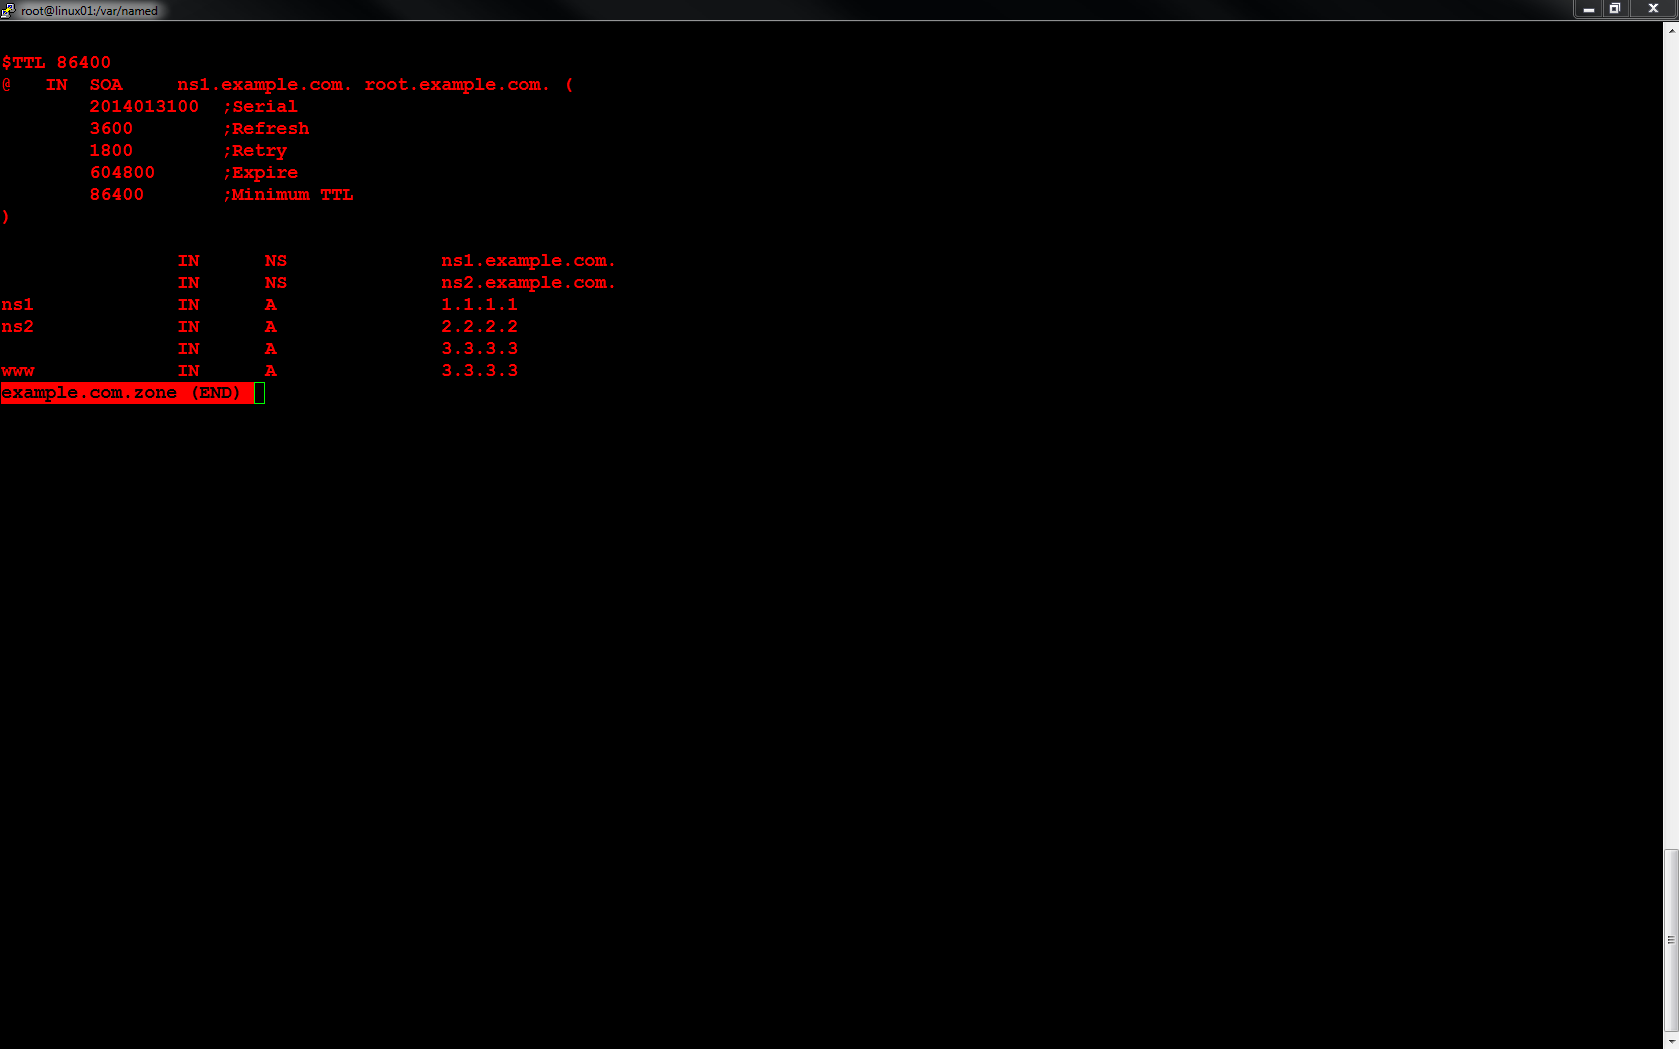
Domain Name System (DNS) is an essential part of any network. Berkeley Internet Name Domain (BIND) may be installed and configured on Linux CentOS and provide DNS name resolution. The configuration of BIND includes zone files. Below you will find a sample zone file for the domain name example.com. You may use this sample as a template and input the DNS records for your corresponding domain name.
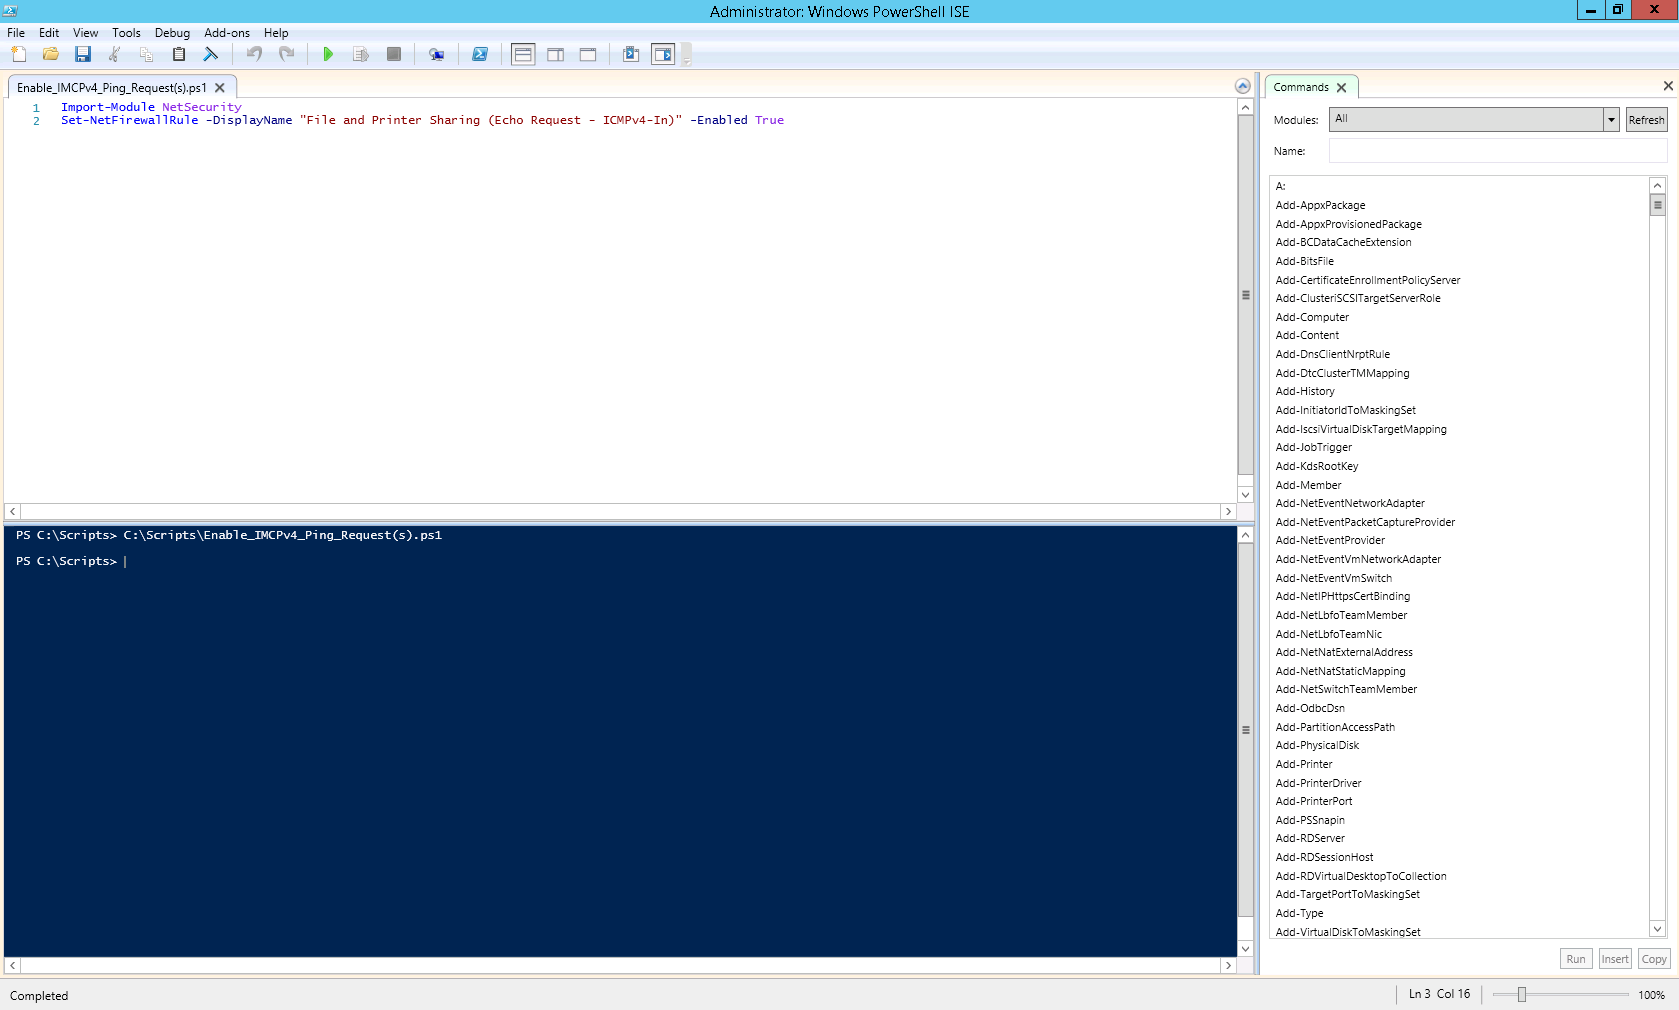
You may use the following (2) commands to enable IMCPv4 ping requests for Windows Server 2012 R2 with Microsoft Windows PowerShell.
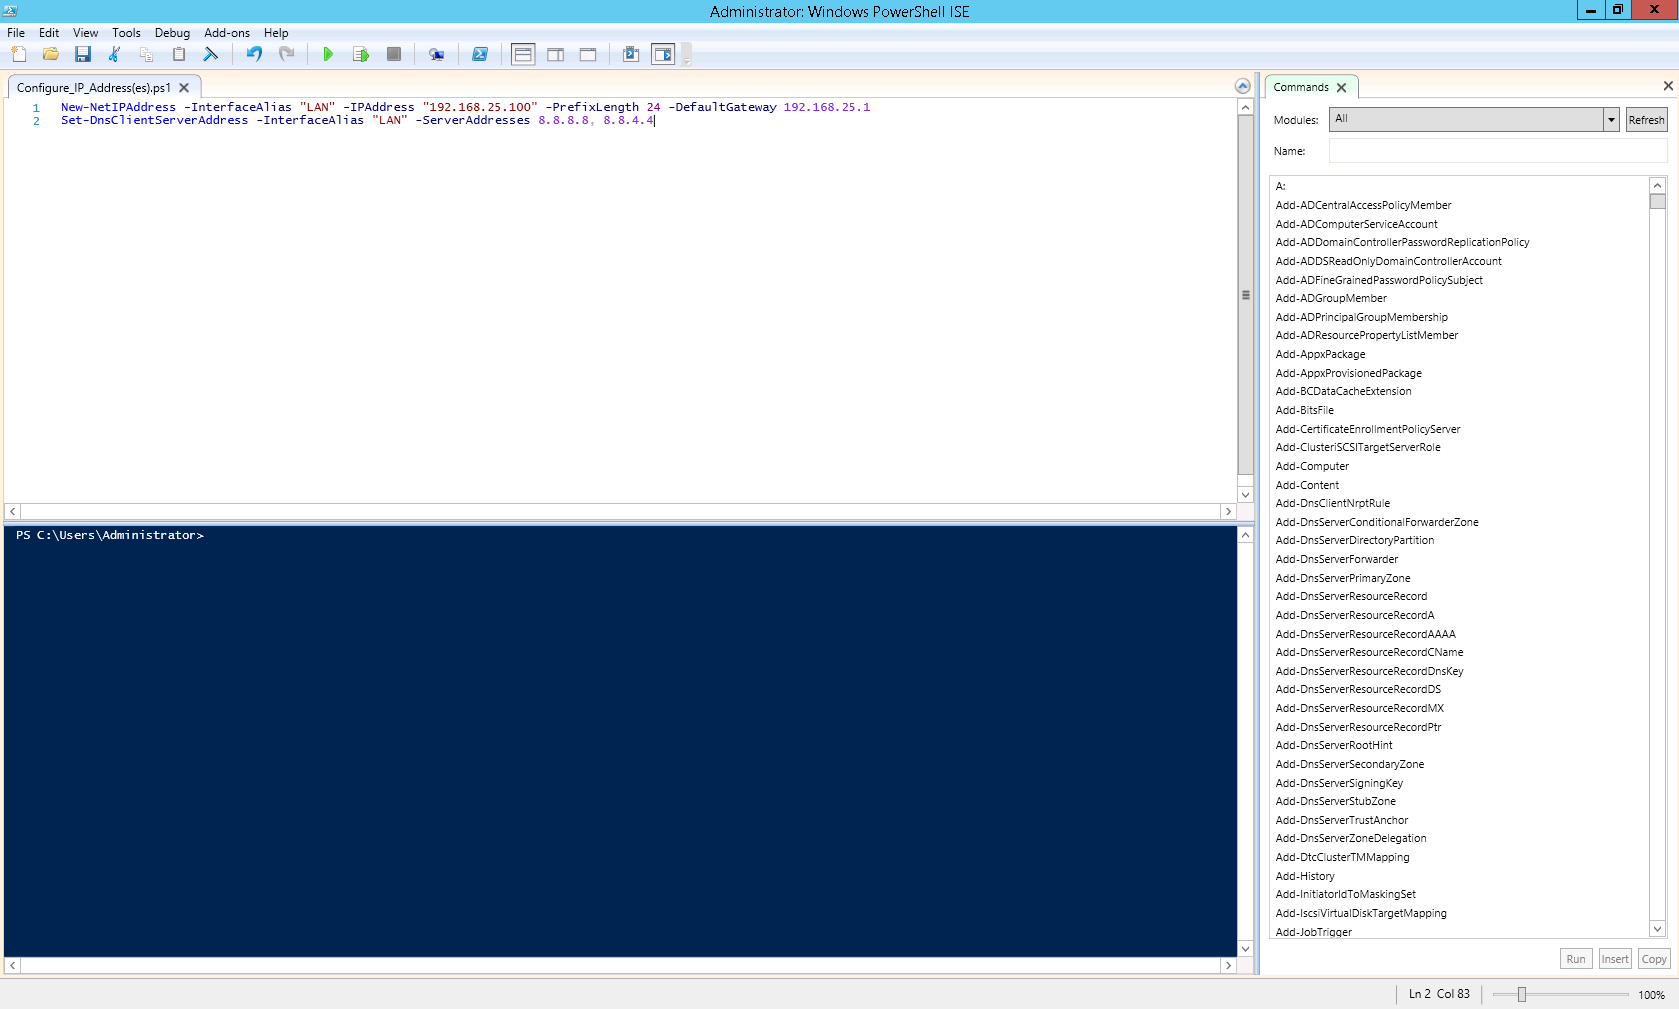
You may modify the following Microsoft PowerShell (.ps1) script to configure the Internet Protocol (IP) and Domain Name System (DNS) servers for a Network Interface Card (NIC) in Windows Server 2012 R2.