Author: Noel Alvarez

VMware ESXi 6.0 – Configure the ESXi Management Network

The following is a step by step guide for configure the ESXi Management Network for a VMware ESXi 6.0 host.

  1. On the Direct Console User Interface (DCUI) press F2.10
  2. In the Authentication Required dialog box enter the root user password and press Enter01
  3. Select Configure Management Network and press Enter02
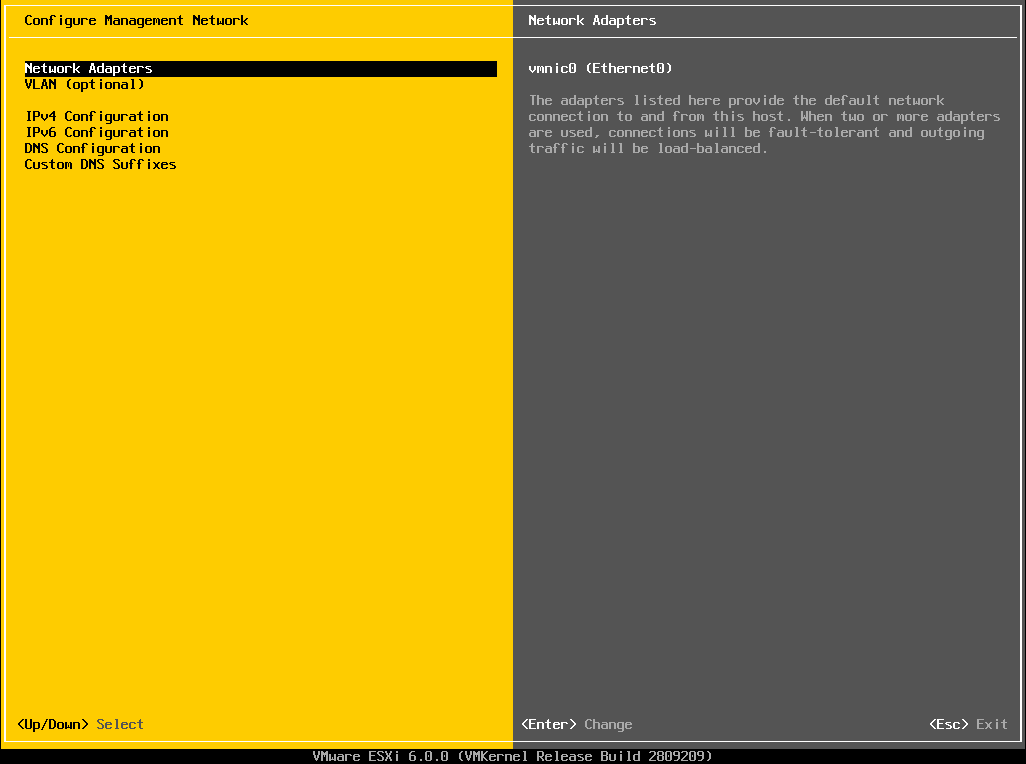
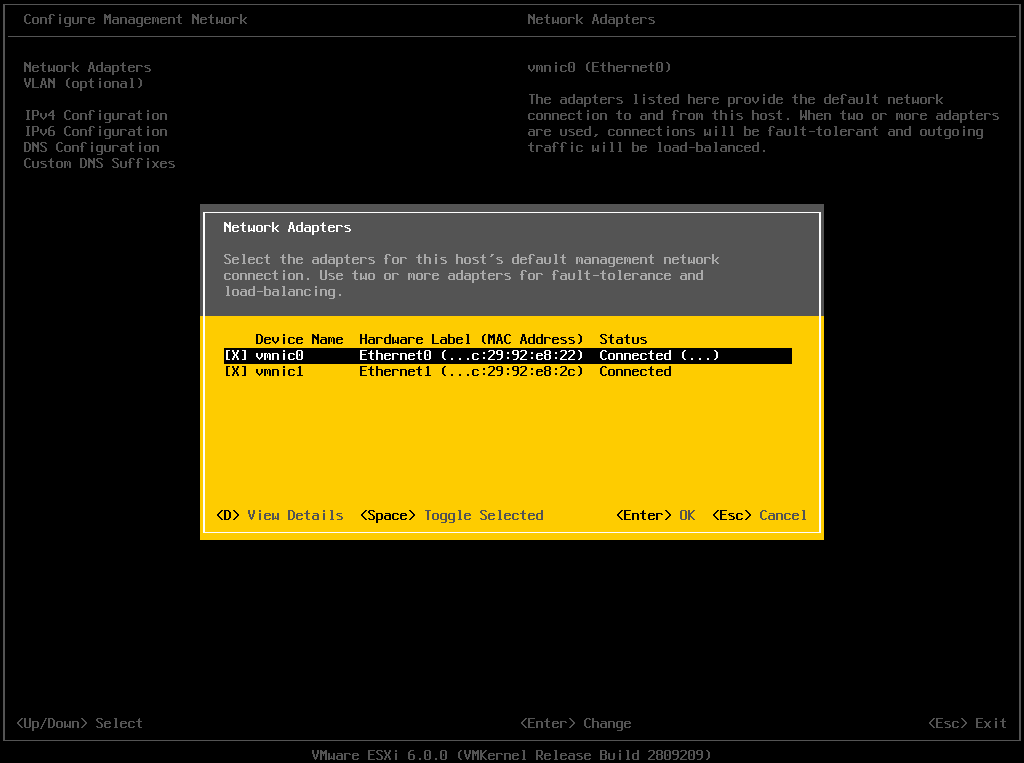
  4. Select Network Adapters and press Enter03
  5. On the Network Adapters dialog box select vmnic0 and vmnic1 for a fault tolerant management network. 04
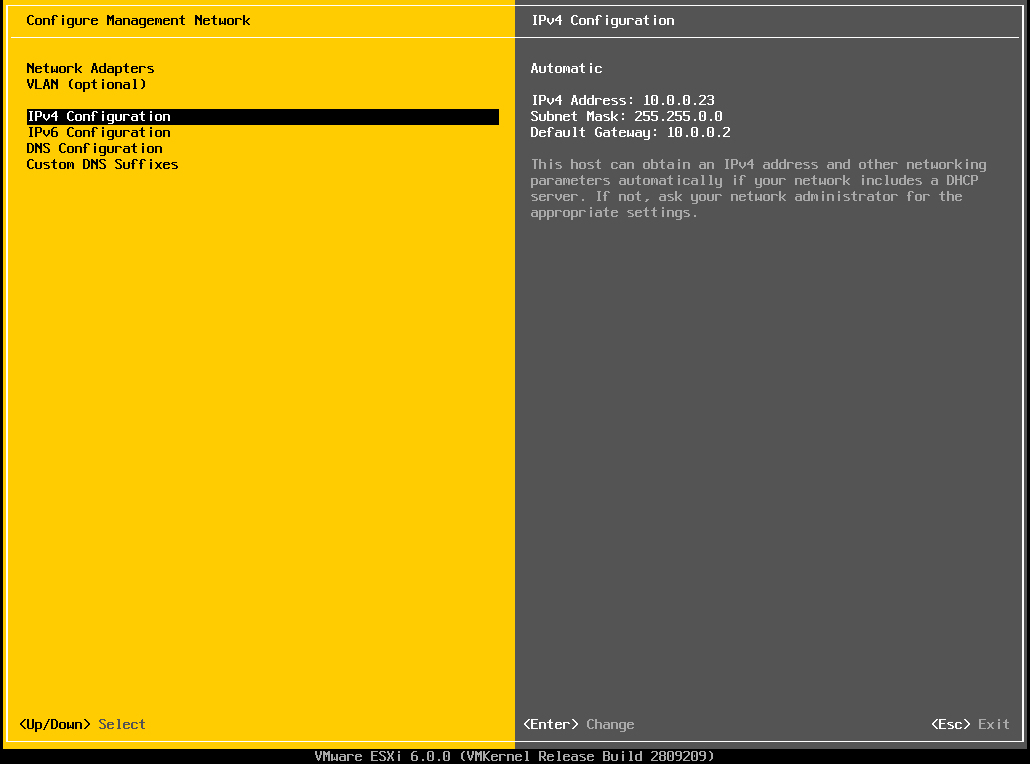
  6. Select IPv4 Configuration and press Enter05
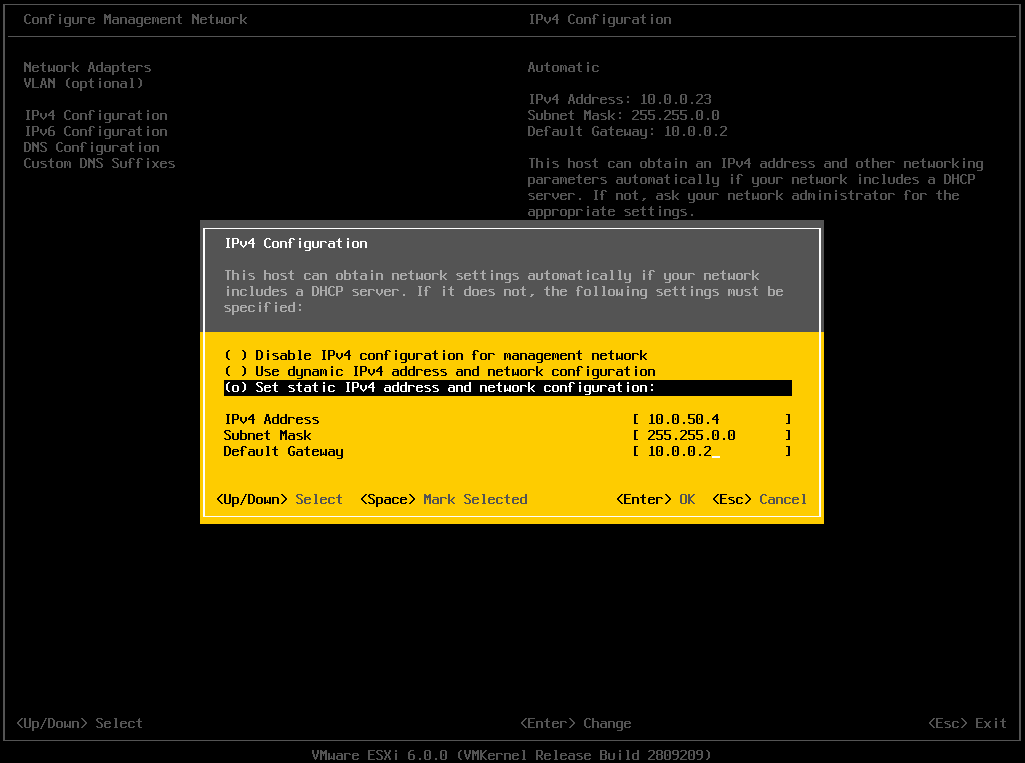
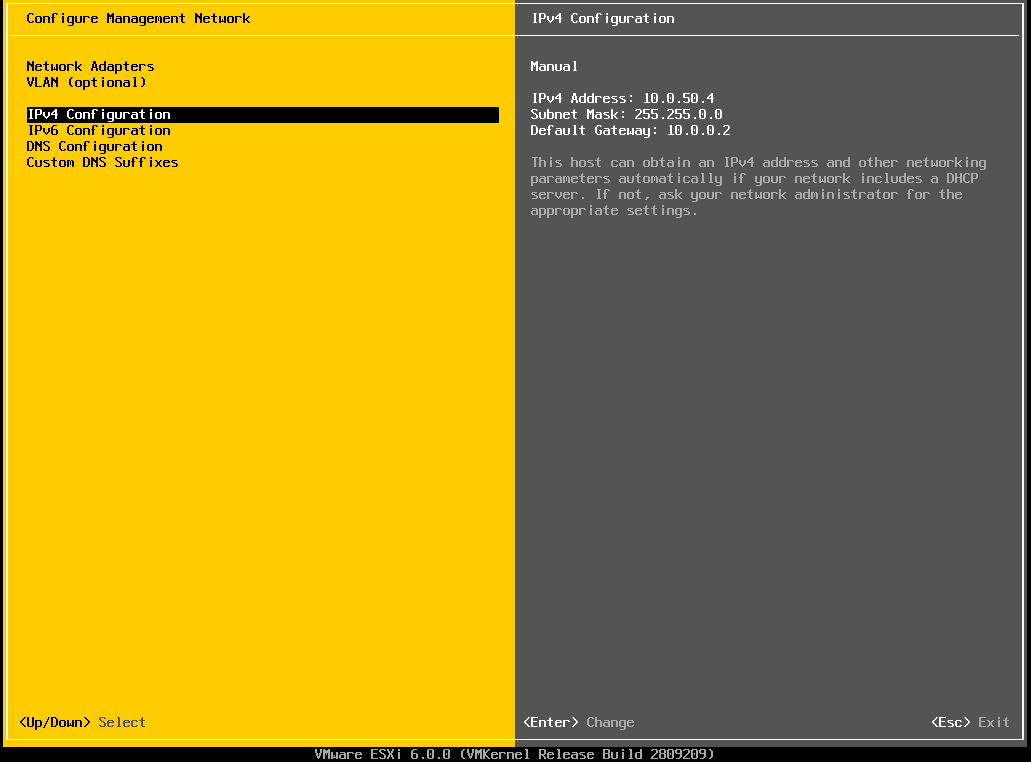
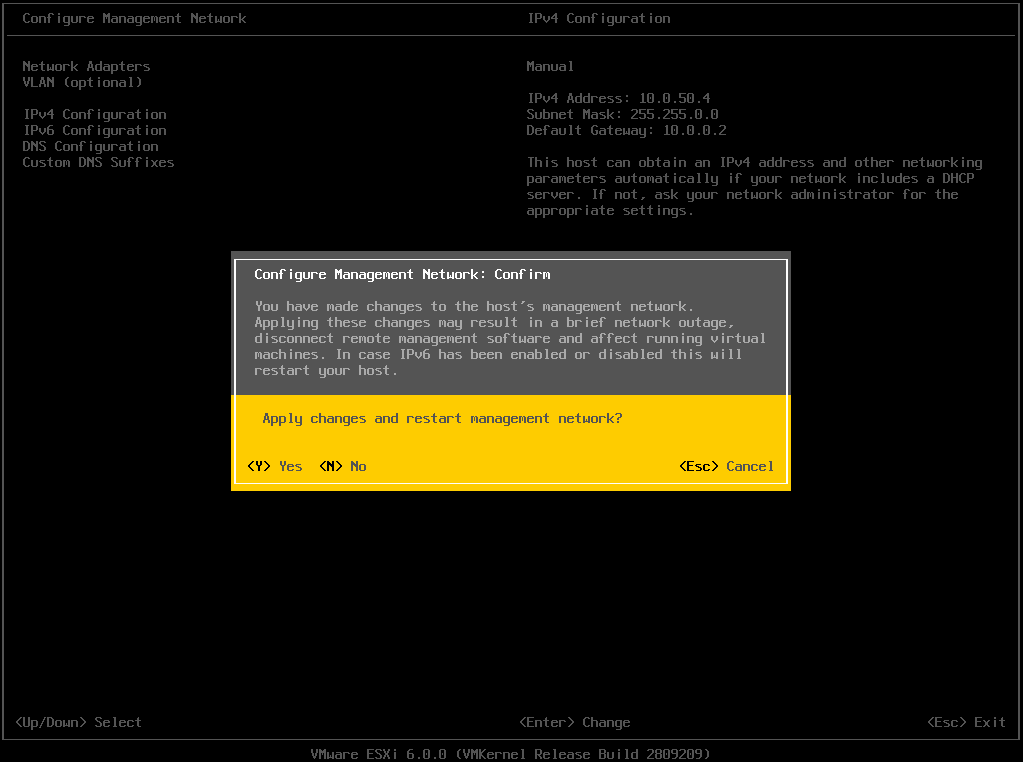
  7.  Select Set static IPv4 address and network configuration: and enter the IP address, subnet mask and default gateway of the host and press Enter06
  8. On the Configure Management Network page press Esc07
  9. On the Configure Management Network: Confirm dialog box press Y08
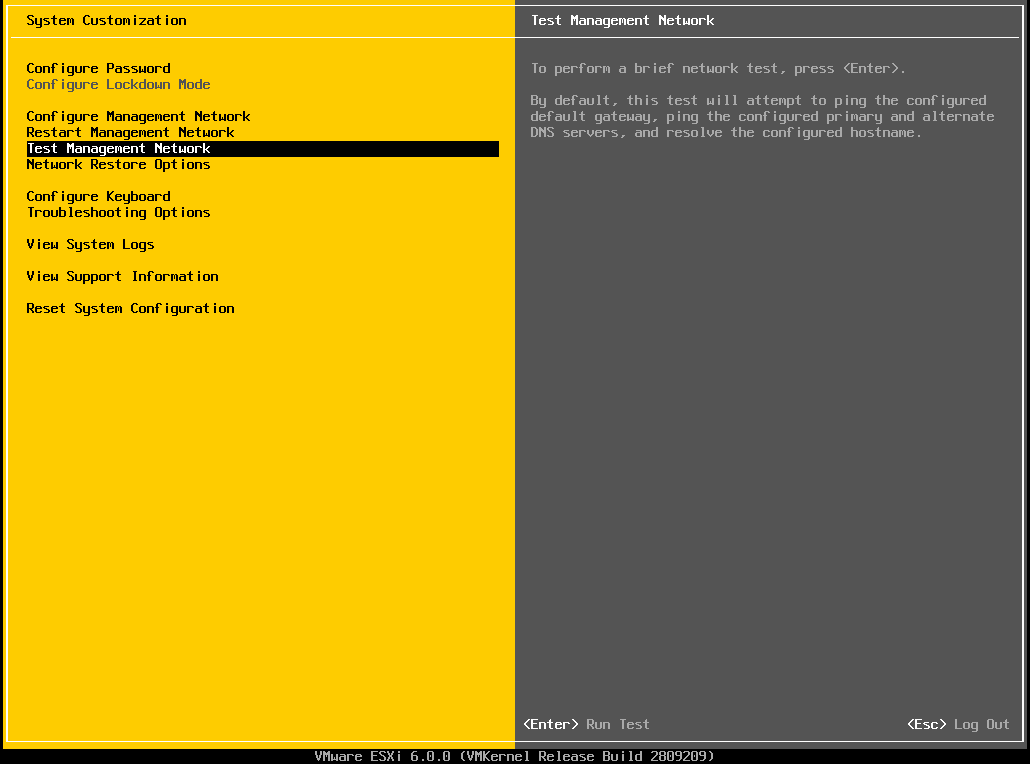
  10. Select Test Management Network and press Enter12
  11. On the Test Management Network dialog box enter the appropriate IP addresses and local hostname. Then, press Enter10
  12. On the Test Management Network dialog box verify that all tests have passed (i.e. OK.). 11
  13. On the System Customization page press Esc to Log Out09
  14. Verify the DCUI is displaying the correct IP address. 13

VMware ESXi 6.0 – Interactive Installation

You may use the following method to perform an interactive installation of  VMware ESXi 6.0.

  1. On the ESXi-6.0.0-20150704001-standard Boot Menu page select ESXi-6.0.0-20150704001-standard installer and press Enter.

01

2. On the Welcome to the VMware ESXi 6.0.0 Installation page press Enter to continue.

02

3. On the End User License Agreement (EULA) page press F11 to Accept and Continue.

03

4. On the Select a Disk to Install or Upgrade page select the appropriate storage device and press Enter to Continue.

04

5. On the Please Select a Keyboard Layout page select US Default and press Enter to Continue.

05

6. On the Enter a root password page enter the appropriate password and press Enter to Continue.

06

7. On the Confirm Install page press F11 to Continue.

07

8. On the Installation Complete page press Enter to Reboot.

09

9. After the reboot you will be directed to the VMware ESXi 6.0 Direct Console User Interface (DCUI).

10


Microsoft Exchange Server 2007 – External E-Mails to an Internal Distribution Group

In order to send emails to a Microsoft Exchange Server 2007 distribution group from an external user uncheck the following setting in the properties of the distribution group.

Mail Flow Settings > Message Delivery Restrictions > Require that all senders are authenticated

Enjoy!


Microsoft Windows Server 2012 R2 – Resynchronize Network Time Protocol Client

You may use the following Windows PowerShell command to resynchronize the Network Time Protocol (NTP) client, in Microsoft Windows Server 2012 R2, with it’s NTP server.

w32tm /resync /nowait

Enjoy!


Microsoft Windows Server 2012 R2 – Configure Network Time Protocol

You may use the following commands, run as an administrator in Windows PowerShell, to configure the Network Time Protocol (NTP) settings for Microsoft Windows Server 2012 R2. In this example, the NTP server to be configured is pool.ntp.org, which is a round-robin of NTP server.

w32tm /config /manualpeerlist:pool.ntp.org /syncfromflags:MANUAL
Stop-Service w32time
Start-Service w32tim

Enjoy!


Microsoft Windows Server 2012 R2 – Query Network Time Protocol Configuration

You may use the following (2) commands to view the Network Time Protocol (NTP) settings for Microsoft Windows Server 2012 R.

  1. w32tm /query /peers
  2. w32tm /query /source

Enjoy!


Microsoft Failover Clustering – Event ID: 1194

In Windows Server 2012 R2 the Cluster Name Object (CNO) will be created in the same Organizational Unit (OU) as the computer objects that comprise the cluster. When configuring a cluster role a Virtual Computer Object (VCO) may need to be created which may fail with Event ID 1194. This is due to the fact that in Windows Server 2012 R2 the VCO will be created in the same OU as the CNO but the CNO, by default, will not have the “Create Computer objects” permission for that OU.

This is resolved by providing the CNO the “Create Computer objects” permission on the OU where it is located. A simple method of completing this is using a Microsoft Active Directory group (ex. Microsoft Failover Clustering), placing the CNO in the group and configuring the “Create Computer objects” permission at the OU level. Below you will find an example.

01


Microsoft Windows Server 2012 R2 – Deleting a PTR Record

If you ever need to delete an individual pointer record (PTR) that is all capitalized and will not delete from the Microsoft Windows Server DNS graphical user interface (GUI) then use the example command below. The example below will delete the PTR record which corresponds to Internet Protocol (IP) address 192.168.25.100.

Remove-DnsServerResourceRecord -ZoneName “25.168.192.in-addr.arpa” -RRType “PTR” -Name “100”


Microsoft Windows Server 2012 R2 – Remote Reboot

You may use the following command to remotely reboot a server forcefully in (180) seconds running Windows Server 2012 R2.

shutdown /r /m \\<<<hostname>>> /f /t 180


Microsoft Windows Server 2012 R2 – Configure NIC Teaming

You may use the Microsoft Windows PowerShell (.ps1) script below to configure NIC teaming in Microsoft Windows Server 2012 R2. Additionally, you may modify the script to meet the needs of your specific environment.

<#
.SYNOPSIS
This script will configure NIC1 and NIC2 to (1) Gbps Full Duplex, disable NIC3 and NIC4, create NIC Team 1 and configure NIC Team 1 TCP/IP settings.
.DESCRIPTION
This script will automate the configuration of Microsoft Windows Server 2012 R2 NIC Teaming.
.EXAMPLE
N/A.
.AUTHOR
Written by Noel Enrique Alvarez on Tuesday, November 10, 2015.
#>

#Request the Internet Protocol (IP) address of the server
$IP_Address = Read-Host “What is the Internet Protocol (IP) address of the server?”

#Configure NIC1 and NIC2 to 1 Gbps Full Duplex
Set-NetAdapterAdvancedProperty NIC1 -DisplayName “Speed & Duplex” -DisplayValue “1.0 Gbps Full Duplex”
Set-NetAdapterAdvancedProperty NIC2 -DisplayName “Speed & Duplex” -DisplayValue “1.0 Gbps Full Duplex”

#Disable NIC3 and NIC4
Disable-NetAdapter -Name “NIC3” -Confirm:$false
Disable-NetAdapter -Name “NIC4” -Confirm:$false

#Create NIC Team 1
New-NetLbfoTeam -Name “Team 1” -TeamMembers NIC1,NIC2 -TeamNicName “TEAM 1” -TeamingMode SwitchIndependent -LoadBalancingAlgorithm Dynamic -Confirm:$false

#Configure NIC Team 1 TCP/IP settings
Get-NetAdapter -Name “Team 1” | Set-NetIPInterface -DHCP Disabled
Start-Sleep 5
Get-NetAdapter -Name “Team 1” | New-NetIPAddress -AddressFamily IPv4 -IPAddress $IP_Address -PrefixLength “XX” -Type Unicast -DefaultGateway “X.X.X.X”
Set-DnsClientServerAddress -InterfaceAlias “Team 1” -ServerAddresses “X.X.X.X”, “X.X.X.X”

#End of script