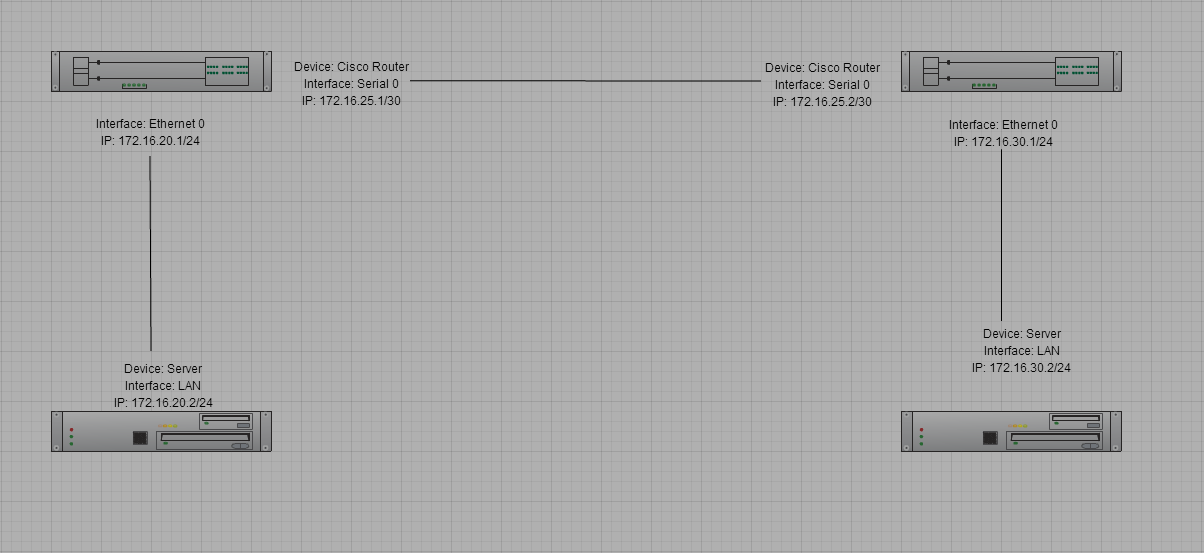
You may use the following commands to configure a Cisco router out-of-box. The diagram below will provide you with a visual of the network topology. There are two (2) routers in this configuration utilizing the Internet Protocol (IP) addresses 172.16.25.1/30 and 172.16.25.2/30. I chose a subnet mask of 255.255.255.252 (/30) for the Wide Area Network (WAN) links because this link will only utilize two (2) IP addresses and the 255.255.255.252 subnet mask allows us to save IP addresses.

For the first step of the configuration I will verify that the router has no previous configuration by executing the show running-config and show startup-config commands. You may verify that this is a freshly restarted router with no previous configuration.

In the second step I will configure the user mode passwords (aux, console and vty), as well as the idle timeouts and a command to stop any router output from disrupting your text. The idea behind these first few configurations is to immediately secure the router.

Next, I will configure the enable mode password with the enable secret password command.

Next, I will configure the hostname of the router. In this example the hostname chosen is ORLSAN01.

Next, I will configure the message of the day (motd), login and exec process creation banner. These provide a warning to any individuals who would seek to login to the router without proper authorization.


Next, I will configure the Serial 0 and Ethernet 0 interfaces. Additionally, the Serial 0 interface will have the clock rate set in order to providing clocking to the second router in the network topology above. In a production environment this would not be necessary but for this demonstration it is.


Next, I will verify that the routing table only contains directly connected networks (no remote networks). Additionally, I will verify that pinging 172.16.30.1/24 will not work because there is no routing table entry for that network. In later configurations we will configure both static and dynamic routing.


Next, I will save the configuration to NVRAM.

In the next portion of this demonstration I will configure the second router (ORLSAN02) but instead of showing all of the output I will only provide the final configuration via show running-config (with the hope of saving space).

From the show running-config you can see that the passwords are in clear text. By using the command service password-encryption and executing the show running-config command you can encrypt the passwords.


Next, I will verify that the routing table on ORLSAN01 still only has directly connected routes (so the ping to 172.16.30.1/24 will fail).

Next, I will configure a static route to the 172.16.30.0/24 network and verify that the route is in the routing table. I chose an administrative distance of (AD) of 150 because these static routes will be a backup in the event that dynamic routing, to be configured later, fails. The S in the routing table signifies that the route is a static route, the C means the route is directly connected. If you ever see an R that means it is a RIP injected route.
 Next, I will configure ORLSAN02 with a static route to the 172.16.20.0/24 network, verify the route is in the routing table then ping 172.16.20.1.

Lastly, I will configure dynamic routing (RIPv2) on both routers, then verify that the RIP injected routes on ORLSAN01 and test the configuration by pinging 172.16.30.1 from the ORLSAN01 router.


Enjoy!
