Category: Microsoft Active Directory

Microsoft Windows PowerShell – List Microsoft Active Directory Group Members

This script will list the name and account name of each user within an Active Directory group and provide the output of the results in a file and directory of your choice.

Example: Get-ADGroupMember -identity “<Group Name>” | Select Name, SamAccountName | out-file -filepath “<File Path>”


Microsoft Active Directory – Windows Server 2012 R2 Domain Controller (DC) Deployment

You may use the following steps to configure Windows Server 2012 R2 as a Microsoft Active Directory Domain Controller.

1. On the Server Manager page click Add roles and features.

01

2. Click Next > on the Add Roles and Features Wizard page.

02

3. Select Role-based or feature-based installation on the Installation Type page.

03

4. On the Server Selection page select the correct server (in this example it is DC01) and click Next >.

04

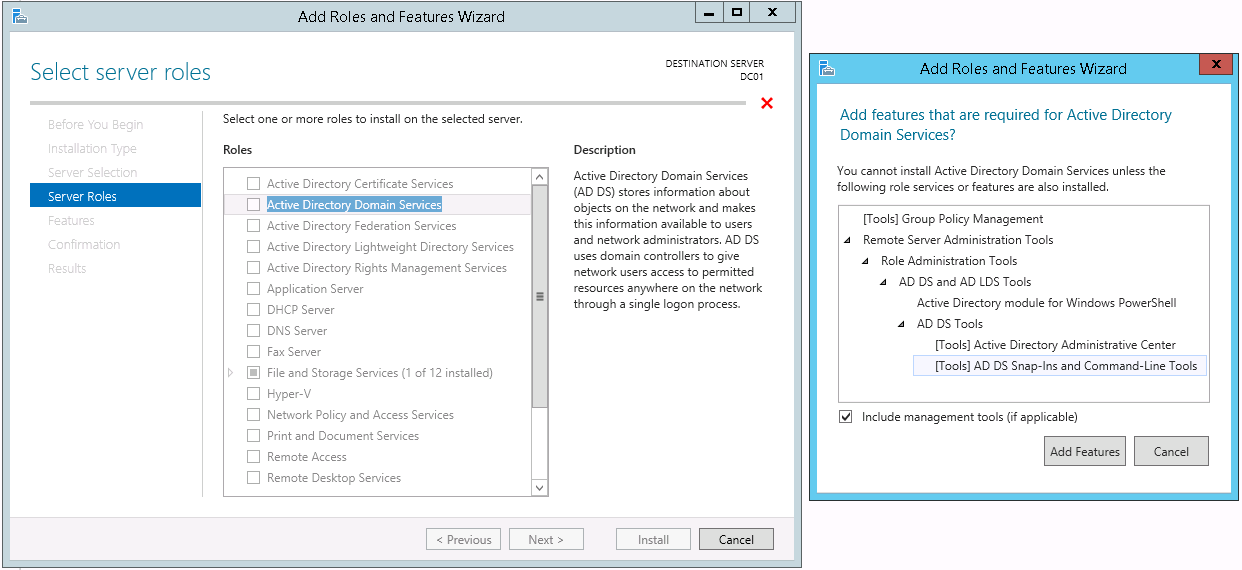
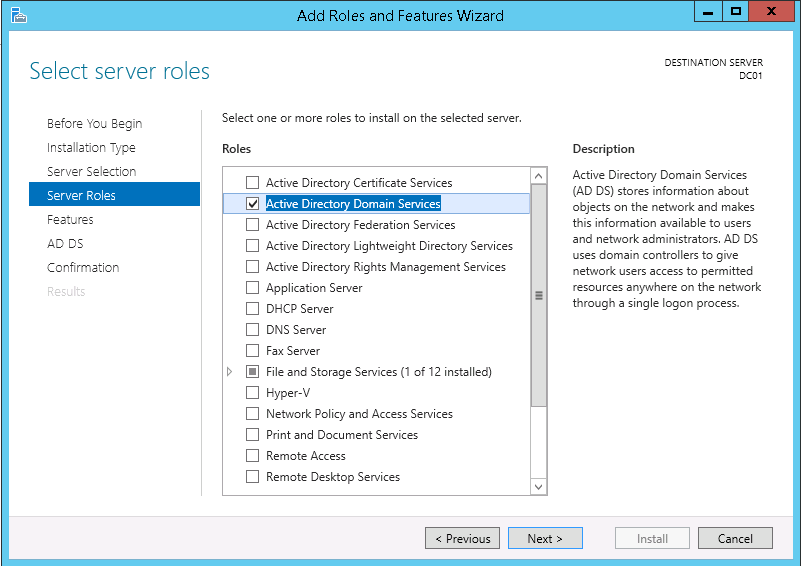
5. On the Server Roles page select Active Directory Domain Services. When asked to Add features that are required for Active Directory Domain Services? click Add Features. Then, on the Server Roles page click Next >.

05 - 01

05 - 02

6. On the Features page click Next >.

06

7. On the AD DS page click Next >.

07

8. On the Confirmation page select the option to Restart the destination server automatically if required and click Install.

08

9. On the Results page click Close.

09

10. On the Server Manager select the notification icon then click Promote this server to a domain controller.

10

11. On the Deployment Configuration tab select Add a new forest and specify the Root domain name:, in this example it is ROOT.SYSADMIN.NET, then click Next >.

11

12. On the Domain Controller Options tab select Windows Server 2012 R2 as the Forest functional level: and Domain functional level:. Additionally, choose a Directory Services Restore Mode (DSRM) password then click Next >.

12

13. On the DNS Options tab click Next >.

13

14. On the Additional Options tab choose the default NetBIOS domain name: and click Next >.

14

15. On the Paths tab select Next >.

15

16. On the Review Options tab click Next >.

16

17. On the Prerequisites Check tab click Install (the server will restart).

17

18. Lastly, verify that the Active Directory Domain Service is running correctly by verifying the existence of Active Directory Domain Services Event IDs 1000 & 1394.

Enjoy!


Microsoft Group Policy Object – “TCP/IP NetBIOS Helper” Service

Yesterday, I continued with the application of Group Policy Objects (GPO) for our workstation (desktop and laptop) users. When running gpupdate /force for a particular user, whose desktop is running Windows XP, I noticed that the GPO wasn’t being applied.

Part of my troubleshooting was to determine if the user’s desktop could access the \\domain.com\SYSVOL directory. On this particular machine it could be accessed using \\domain\SYSVOL but not with \\domain.com\SYSVOL. In other words, appending the top level domain (TLD) revealed a name resolution failure.

The solution was to start the DNS Client, Netlogon and TCP/IP NetBIOS Helper services and configure their startup type to automatic (I will need to troubleshoot the determine the root cause of the services not running).

Enjoy!


Microsoft Group Policy Object – Event ID 1030, 1097 and 1110

At my current employer I have been creating Group Policy Objects (GPO) in an effort to centrally administer the workstation environment, provide automation and provide consistency in workstation deployment and management.

After running gpupdate and gpresult on a Microsoft Windows XP desktop I realized that the GPOs were not being applied. After looking through the Event Viewer logs I found GPO event IDs 1030, 1097 and 1110.

It turned out that the Netlogon service was disabled. The solution was to configure the Startup type: to Automatic.

Enjoy!


Microsoft Group Policy Object – Group Policy Preference Client Side Extensions for Windows XP (KB943729)

I am currently in the process of automating the desktop deployment for my current employer. As a solution I am using Microsoft Group Policy Object (GPO) to map the network drives for the users. To date, most of my experience has been testing GPOs with Microsoft Windows 7 but today I was testing a GPO on a Windows XP desktop.

After modifying the GPO and placing the desktop in an Organizational Unit (OU) where the GPO was applied I expected the mapped drives to work, but they didn’t. After running gpresult I was able to verify that the GPO was in fact being applied, etc. I then logged on to a Microsoft Windows 7 desktop, that was in the same OU, and the drives were mapped.

The solution to this was simple. I needed to download and install the Group Policy Preference Client Side Extensions for Windows XP (KB943729) on the Windows XP desktop.

Hopefully you will find this information helpful.

Enjoy!


Microsoft Active Directory – Windows Server 2008 R2 Enterprise Domain Controller (DC) Deployment

Implementing a Microsoft Active Directory (AD) domain allows you to centrally manage almost all aspects of a network. For this reason, domains have been used in many corporate networks. In order to implement an AD domain you must have a Domain Controller (DC). This tutorial will provide you with a basic step-by-step guide on deploying a Microsoft Windows Server 2008 R2 Enterprise edition DC.

To begin, type dcpromo in the start menu.

00

In the Active Directory Domain Services Installation Wizard, initial page, click Next >.

01

In the Operating System Compatibility page click Next >.

02

In this example, the domain will be the first in a new forest so we will select Create a new domain in a new forest. After selecting that option click Next >.

03

In the Name the Forest Root Domain dialog box type the fully qualified domain name (FQDN) for this domain. For this example I have chosen root.sysadmin.net (but you may chose a different FQDN). After you enter the FQDN click Next >.

04

In the Set Forest Functional Level page select Windows Server 2008 R2 under the Forest functional  level: option then click Next >.

05

In the Additional Domain Controller Options page select the check box next to DNS Server to make this DC controller a Domain Name System (DNS) server then click Next >.

06

If you receive a dialog box stating A delegation for this DNS server… then click Yes.

07

In the Location for Database, Log Files, and SYSVOL dialog box, accept the defaults (as this is a very basic configuration), and click Next >.

08

In the Directory Services Restore Mode Administrator Password page type a password of your choosing then click Next >.

09

In the Summary page I recommend clicking Export settings… and saving the file. This may be used in the future for documentation, etc. After you export the settings click Next >.

10

At this point you will see a new dialog box appears as Active Directory Domain Services are being configured.

11

In the Completing the Active Directory Services Installation Wizard dialog box click Finish.

Select Restart Now in the following prompt.

12

After the server restart and you login, open the Event Viewer and view the Directory Services logs. In particular, looking for Event Viewer ID 10001394.

13

14

This completes the Microsoft Active Directory Domain Controller deployment.

Enjoy!


Group Policy Object – Map Network Drive

You may use the following Microsoft Active Directory (AD) Group Policy Object (GPO) settings to map a network drive in Windows XP/7.

GPO Path: User Configuration\Preferences\Windows Settings\Drive Maps

GPO Settings: New\Mapped Drive

Additionally, you may specify which users the GPO applies to by using Item-level targeting under the Common tab. My recommendation is a Security Group.

Enjoy!


Group Policy Object – Standard Security Settings GPO

You may use the following Windows Server 2012 Group Policy Object (GPO) settings to configure basic security settings for Windows Server 2008/2012/2012 R2 or Windows 7/8/8.1.


Local Logon and Local Administrators

GPO Path: Computer Configuration\Policies\Windows Settings\Security Settings\Local Policies\User Right Assignment

GPO Setting: Allow log on locally (used to define this user group)

GPO Path: Computer Configuration\Policies\Windows Settings\Security Settings\Restricted Groups

GPO Settings: Administrators (used to define this user group)


Desktop Lockout Configuration

GPO Path: User Configuration\Policies\Administrative Templates\Control Panel\Personalization

GPO Setting: Enable Screen Saver

GPO Setting: Force Specific Screen Saver (Screen saver executable name: C:\Windows\System32\scrnsave.scr)

GPO Setting: Password protect the screen saver

GPO Setting: Screen saver timeout (seconds: 180)

GPO Path: Computer Configuration\Policies\Administrative Templates\System\Group Policy

GPO Setting: Policy Setting: Configure user Group Policy loopback processing mode


RDP Configuration

GPO Path: Computer Configuration\Policies\Administrative Templates\Network\Network Connections\Windows Firewall\Domain Profile

GPO Setting: Windows Firewall: Allow ICMP exceptions

GPO Setting: Windows Firewall: Allow inbound Remote Desktop exceptions

GPO Path: Computer Configuration\Policies\Administrative Templates\Windows Components\Remote Desktop Services\Remote Desktop Sessions Host\Connections

GPO Setting: Allow users to connect remotely by using Remote Desktop Services

GPO Path: Computer Configuration\Policies\Windows Settings\Security Settings\Restricted Groups

GPO Setting: Remote Desktop Users (used to define this user group)


Firewall Allow ICMP (Ping) Requests

GPO Path: Computer Configuration\Policies\Windows Settings\Security Settings\Windows Firewall with Advanced Security\Windows Firewall with Advanced Security\Inbound Rules


Enjoy!


Group Policy Object – Disable the Windows 7 Professional Screen Resolution Settings

You may use the following Group Policy Object (GPO) settings to lock the Screen Resolution settings in a Windows Server 2003 R2 Active Directory (AD) domain.

To configure the Screen Resolution settings open the Group Policy Management Console (GPMC) and create a Group Policy. This may be done by right clicking the Group Policy Objects organizational unit (OU) and selecting New. Additionally, you may right click the OU that contains the desktop(s) of your user(s) and selecting Create a GPO in this domain, and Link it here…. In the new New GPO dialog box name the GPO Lock Screen Resolution. Right click the newly created GPO and select Edit…from the context menu. Once the GPO opens navigate to the following setting.

User Configuration > Policies > Administrative Templates > Control Panel/Display

Enable the setting to “Disable the Display Control Panel

Enjoy!


Group Policy Object – Rename and Modify Password for Local Administrator Account

In an effort to make a network more secure you may modify both the name and password of the local administrator account for all of your Microsoft Windows workstations by applying a Group Policy Object (GPO) to the organizational unit (OU) that contains those workstations.

To modify the local administrator username and password open the Group Policy Management Console (GPMC) and create a Group Policy. This may be done by right clicking the Group Policy Objects organizational unit (OU) and selecting New. Additionally, you may right click the OU that contains the desktop(s) of your user(s) and selecting Create a GPO in this domain, and Link it here…. In the new New GPO dialog box name the GPO Modify Local Administrator Account. Right click the newly created GPO and select Edit…from the context menu. Once the GPO opens navigate to the following setting.

Computer Configuration > Preferences > Control Panel Settings > Local Users and Groups

Right click Local Users and Groups select New > Local User.

In the New Local Users Properties dialog box enter the following information:

User name: Administrator

Rename to: <new username>

Password: <password>

Confirm Password: <password>

Enjoy!